Automate Proxmox VM Configuration with NetBox and Flask
NetBox is the world’s most popular Network Source of Truth (NSoT) with tens of thousands of installations globally. It is used extensively for documenting/modeling networks (network devices, virtual machines, etc), and also provides a great IPAM solution. Proxmox is a freely available virtualization technology that allows you to deploy virtual machines (VMs) at scale, optionally in a clustered configuration. Proxmox has approximately 900,000 hosts and more than 130,000 users in its open source community.
The netbox-proxmox-automation, which is free for all to use, provides an integration between virtual machine documentation in NetBox and automates the deployment of virtual machine configurations in Proxmox. Users define the desired state of a Proxmox virtual machine in NetBox then automate said virtual machine configuration in Proxmox. This guidance includes creation, removal, and changes to Proxmox VMs and their underlying network and storage (VM disk) configurations.
The underlying automation is driven by using webhooks and event rules in NetBox. When you induce a change to a [Proxmox] VM in NetBox, this triggers an event (based on a matching event rule); the event rule then connects to an underlying webhook. The underlying webhook is a Flask application that receives a payload of data from the VM event that was triggered in NetBox – then automates the relevant VM configuration changes in Proxmox.
More of a visual learner? You can see a netbox-proxmox-automation demonstration here.
Why Managing Proxmox VMs with Automation from NetBox Makes Sense
Regardless of whether you are using Proxmox or some other virtualization technology, everyone faces the same challenge: Why does my VM desired state differ from my VM operational state?
When you provision (change or remove) a VM in Proxmox, does your change reflect your desired VM state? And how did you define your desired Proxmox VM state(s) in the first place? All too frequently changes are induced in an environment –where people lose sight of why a change was made and/or what “good” should look like. This is where NetBox has proven itself to be invaluable as a Network Source of Truth (NSoT), such that you will align your desired Proxmox VM state with your operational Proxmox VM state through automation.
For example, Proxmox lets you deploy VMs that have duplicate names (for uniqueness, Proxmox only requires that each VM has a unique Virtual Machine ID [vmid]). Let’s say that you have two Proxmox VMs that have been provisioned with the name ‘vm1’. Each of these Proxmox VMs has different allocated resources (disks, sizes, CPU, memory, and IP addresses) but neither of these Proxmox VMs were tagged in a way that states their underlying purposes. Configuration choices like these may have made sense when these VMs were allocated in Proxmox, but untangling this configuration will prove to be a challenge for those who are unfamiliar with why the Proxmox VMs were created this way originally.
This is where NetBox will bring total clarity to this situation. Should you document your Proxmox VMs in NetBox (to define their desired states/intended configurations) then automate Proxmox VM deployment / configuration changes based on how you’ve defined your Proxmox VMs in NetBox. For starters, NetBox enforces uniqueness. While you may need to create two Proxmox VMs with the name of ‘vm1’, NetBox requires that you use tenancy, for example, to differentiate between the two Proxmox VMs. Let’s say that you define a Tenant in NetBox to reflect departments in your company. The first ‘vm1’ can be part of the ‘Legal’ tenant, while the second ‘vm1’ could be part of the ‘HR’ tenant. By using Tenancy in NetBox, not only can you deploy Proxmox VMs in the way that you want, but NetBox also gives you the ability to document your desired state by way of VM descriptions.
Ultimately, facilitating Proxmox automation through NetBox will close the loop on any configuration drift with your Proxmox VMs.
Using netbox-proxmox-automation
The netbox-proxmox-automation does not currently discover Proxmox VMs / add them to NetBox. Proxmox has an existing NetboxPlugin.pm that should handle this functionality for you, or you can use NetBox-Proxbox. NetBox-Proxbox is a NetBox plugin that can be used to discover Proxmox VMs and add them to NetBox.
A Flask application (and you can use example-netbox-webhook-flask-app for testing and more) must be running for this automation to work. You can run this Flask application anywhere (desktop, laptop, in the cloud, etc) – as long as NetBox is able to use the Flask application as a webhook.
Accessing netbox-proxmox-automation Documentation
When you clone netbox-proxmox-automation, you can create a documentation set from the existing repository. mkdocs is used to render the documentation, which will be accessible through http://localhost:8000 on your web browser of choice. Here’s how to get the netbox-proxmox-automation documentation rolling.
shell$ cd /path/to/netbox-proxmox-automation
shell$ python3 -m venv venv
shell$ source venv/bin/activate
(venv) shell$ pip install -r requirements.txt
(venv) shell$ mkdocs serve
You should then be able to access the docs, as shown in the output message, in your web browser of choice.
Example Usage of Flask Application
shell$ cd /path/to/netbox-proxmox-automation/example-netbox-webhook-flask-app
shell$ python3 -m venv venv
shell$ source venv/bin/activate
(venv) shell$ pip install -r requirements.txt
(venv) shell$ flask run -h 0.0.0.0 -p 8000 –debug # your port (-p) of choice
Example Webhook Creation in NetBox
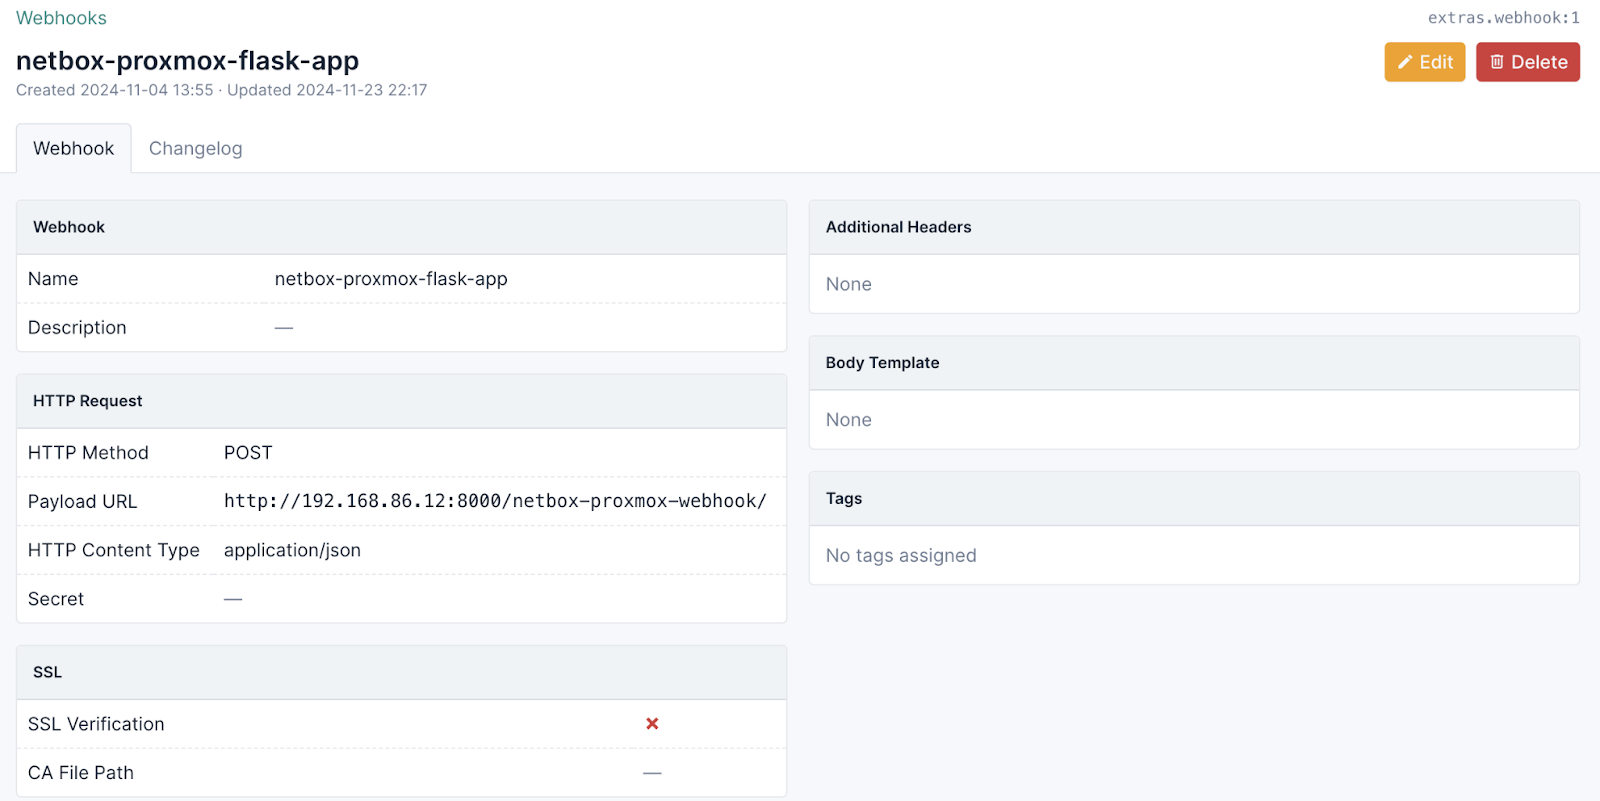
Once the Flask web application is running, you will need to create a webhook in NetBox. This webhook will handle all of the event rules that will be incoming from NetBox. Your webhook should look something like this.
Example NetBox Event Rules
NetBox Event Rules are discussed at http://127.0.0.1:8000/netbox-event-rules-and-webhooks-flask/
You should create event rules in NetBox as documented above.
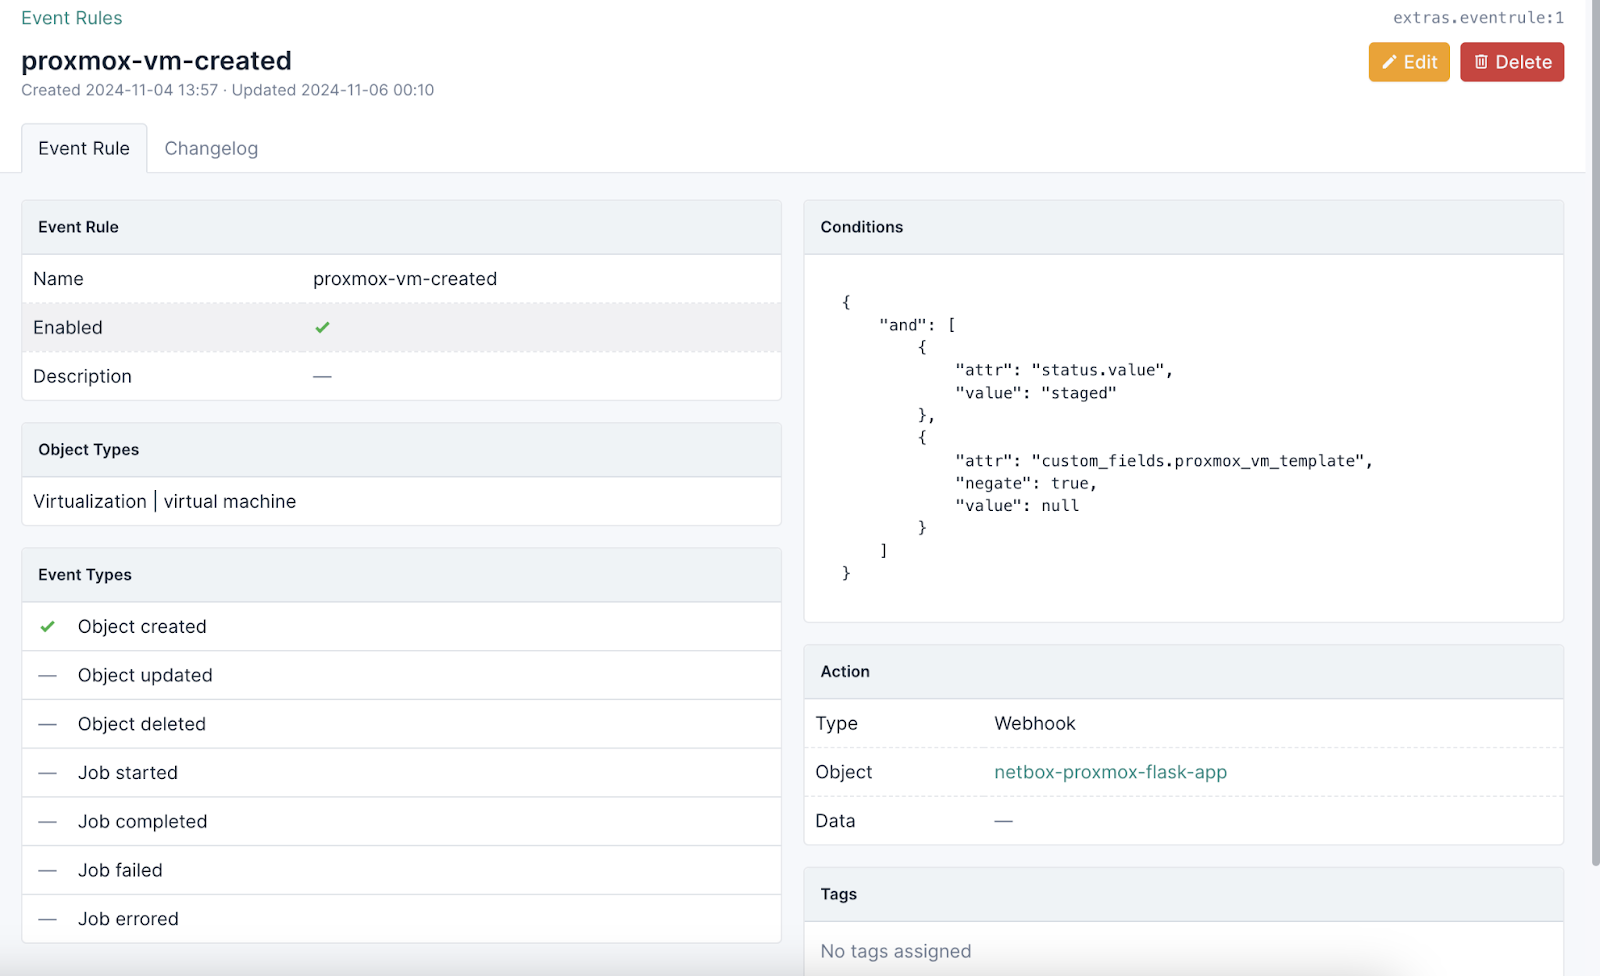
The NetBox Event below is triggered when a NetBox VM is created, with a status of “staged,” and a Proxmox VM template has also been selected.
Flask Application Automation Details
The following describes how specific event rules trigger Proxmox automation.
- When a new Proxmox VM is created in NetBox (VM name, status == ‘Staged’, name of Proxmox VM template selected, SSH public key populated), netbox-proxmox-automation will:
- Clone a Proxmox VM template to a new VM of ‘name’
- Define any resources (vcpu, memory size) in the cloned Proxmox VM that were defined in NetBox
- Define SSH key in the cloned Proxmox VM that was defined in NetBox
- When a Proxmox VM is changed in NetBox (VM name, status == ‘Staged’, VM network interface created, primary IP set for network interface, SSH public key populated), netbox-proxmox-automation will:
- Collect the IP address from Proxmox VM configuration in NetBox, and define ‘net0’ (ipconfig0) configuration in Proxmox for the VM. This will set the IP address and default gateway of the Proxmox VM
- Define SSH key in the cloned Proxmox VM that was defined in NetBox (if not specified earlier)
- When a Proxmox VM is changed in NetBox (VM name, status == ‘Staged’, VM disk ‘scsi0’ created with a size of 20000MB), netbox-proxmox-automation will:
- Resize ‘scsi0’ in Proxmox to 20GB. (NOTE: Proxmox will not let you shrink disk sizes.)
- When a Proxmox VM is changed in NetBox (VM name, status == ‘Staged’, VM disk ‘scsi1’ created with a size of 15000MB), netbox-proxmox-automation will:
- Create disk ‘scsi1’ in Proxmox with a size of 15GB. (NOTE: Proxmox will not let you shrink disk sizes.)
- When a Proxmox VM is changed in NetBox (VM name, status == ‘Staged’, VM disk ‘scsi1’ resize to 30000MB), netbox-proxmox-automation will:
- Resize disk ‘scsi1’ in Proxmox to size 30GB. (NOTE: Proxmox will not let you shrink disk sizes.)
- When a Proxmox VM is changed in NetBox (VM name, status == ‘Staged’, VM disk ‘scsi1’ removed), netbox-proxmox-automation will:
- Remove disk ‘scsi1’ in Proxmox, for VM name.
- When a Proxmox VM is changed in NetBox (VM name, status == ‘Active’), netbox-proxmox-automation will:
- Start Proxmox VM with name VM name.
- When a Proxmox VM is changed in NetBox (VM name, status == Offline), netbox-proxmox-automation will:
- Stop Proxmox VM with name VM name.
- When a Proxmox VM is removed from NetBox (VM name), netbox-proxmox-automation will:
- Remove VM from Proxmox
Give netbox-proxmox-automation a try today!
You can see a netbox-proxmox-automation demonstration here. Got feedback? I’d love to hear from you on the NetDev Slack or through feature or pull requests on GitHub.
