Introducing NetBox 4.5’s New Object Owner Functionality
If you’ve managed a data center or large network, you know the headache of manually tracking which person or team is responsible for each piece of hardware. Maybe you’ve kept a spreadsheet of device contacts or used a Custom Field in NetBox to designate responsibility. NetBox 4.5 offers a cleaner solution: a new Owner model that lets you assign groups of users or individual users as the owner of a device (or other object) directly in NetBox.
The Owner Model
An Owner represents a set of users and/or user groups who are responsible for the administration of certain resources. In other words, you can create an Owner that includes one or more NetBox user accounts and/or entire user groups as members. This flexibility means an Owner could be a team (represented by a user group) plus specific individuals – for example, a “Database Team” owner might include the DB Admins group and a senior DBA user for oversight. Most core object types in NetBox (devices, VMs, circuits, etc.) now have an optional Owner field giving users a native way to note who’s responsible for an object without relying on custom fields or tags.
Creating an Owner (Users and Groups)
Before assigning owners to devices, you need to create an Owner entry that defines who the owner is. NetBox Owners can mix and match multiple user accounts and user groups under one umbrella:
- Navigate to the Owners section in NetBox: Admin -> Ownership -> Owners
- Add a new Owner, give it a descriptive name (for example, “Network Operations Team” or “Site XYZ On-Call”).
- Select User Groups: In the Owner’s form, choose one or more existing user groups that should be members of this owner (e.g. a NetOps group).
- Select Users: Additionally, pick any individual user accounts that should be members. You can have both groups and individual users in the same Owner. This is great for including extra contacts like a specific engineer or manager alongside a team group.
- Once you’ve added all the relevant members, click Save.
After this, you have an Owner object representing your team or composite group of users. For example, an Owner named “Datacenter Team Alpha” might include the DC-Techs user group and a senior technician user. This Owner can now be assigned to devices and other objects.
Assigning an Owner to a Device
With an Owner defined, linking it to a device is straightforward. You can assign an owner when adding a new device, editing an existing device, or bulk editing devices in NetBox:
- Edit a Device: Navigate to Devices -> Devices, click on your device (e.g. a specific firewall or server), and click Edit.
- Choose the Owner: In the device’s edit form, find the Owner field (at the bottom), and then select the Owner you created from the dropdown list, then click Save.
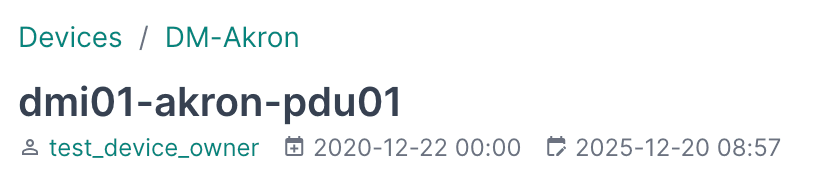
That’s it – the device is now “owned” by the group/users you specified. On the device’s detail page, you’ll see the Owner linked below the device name so that anyone viewing the device in NetBox can quickly find out who is responsible for it.
Interacting with Owners
Tip: Use Configure Table on the device (or other object’s) list view to add the Owner column
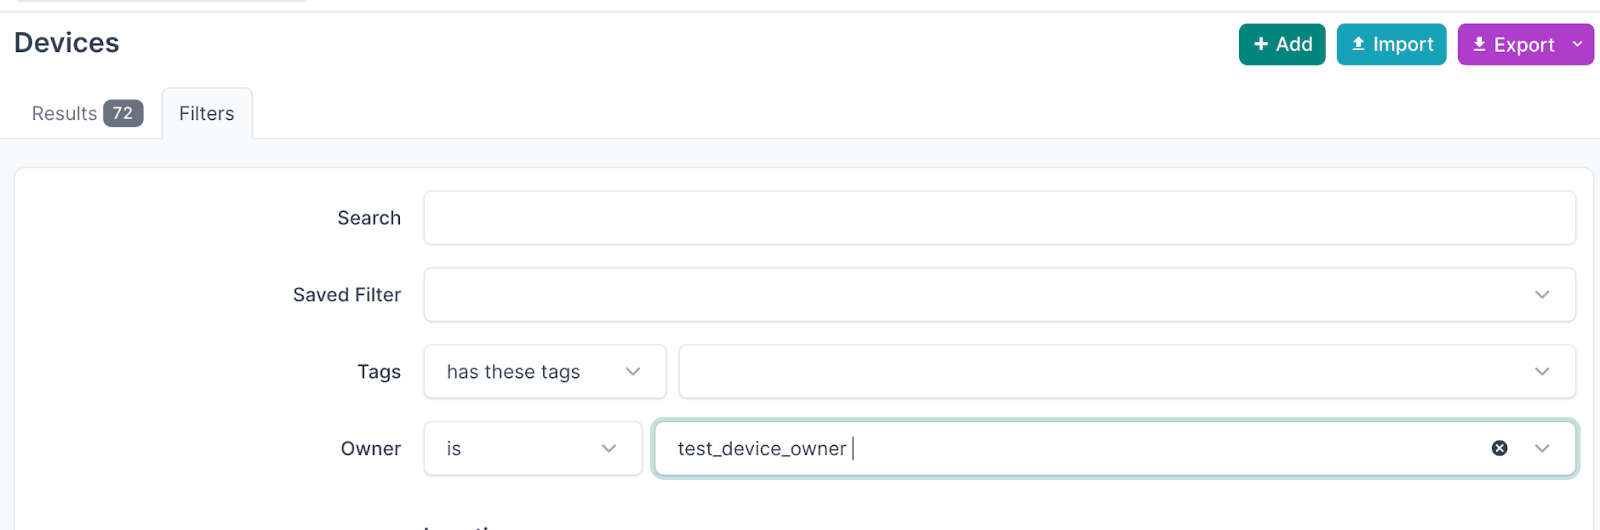
Device List Views: On the Devices list (or circuits, VMs, etc.), you can filter by Owner just like by site or status. For example, use the filter panel to select an Owner, and NetBox will then show you all devices owned by that team.
- Owner Detail Page: You can also click on an Owner’s name wherever it’s shown (such as on a device’s detail view). This brings you to the Owner detail page, which lists all member users/groups and a list of all objects that have been assigned to that Owner. It’s a quick way to see, for instance, every device and circuit that a particular team is responsible for.
- API and Scripts: If you leverage NetBox’s APIs, the Owner field will be included in the output for objects that have owners assigned.
Using Owner Groups for Organization
What if you end up with a lot of different Owners? This can happen in big environments – you might have dozens of team entries for various groups. NetBox 4.5 introduces Owner Groups to help keep things organized. An Owner Group is a way to group related Owners. For example, you might create Owner Groups like “Network Teams”, “Server Teams”, or “Customer X Teams” and assign each Owner to one of these groups based on its nature.
Owner Groups are just for your convenience in organizing; they do not affect the ownership relationship itself. They’re similar in concept to how Device Roles group devices or how Tenant Groups categorize tenants. So if you assign two different owners to the group “Network Teams”, it doesn’t link those owners together in any way beyond categorization, and it doesn’t impact the devices those owners manage.
Using Owners with Permission Constraints
Beyond tracking responsibility, Owners unlock a powerful permissions pattern: delegated administration. NetBox’s object-based permissions support constraints that can reference the current user—and this works beautifully with ownership.
The Use Case: Team Self-Service
Imagine you have three teams—Network Ops, Database Team, and Security—each responsible for their own set of devices. You want each team to only be able to modify their own devices, not devices owned by other teams. Traditionally, you’d need to create separate permissions for each team, perhaps constrained by site, tenant, or device role. But what happens when ownership changes? You’d have to update the permissions too.
With Owners, there’s a cleaner solution. Because an Owner links directly to NetBox users and groups, you can create a permission constraint that dynamically matches objects based on ownership membership.
Setting It Up
- Create Owners for each team – As described earlier, create an Owner for each team (e.g., “Network Ops”, “Database Team”) and add the relevant users or groups as members.
- Assign owners to devices – Assign each device to the appropriate Owner based on which team is responsible for it.
- Create a permission with an Owner constraint
Navigate to Admin → Permissions → Object Permissions and create a new permission:
- Name: “Modify Owned Devices”
- Object Types: Select “device” (and any other object types you want this to apply to)
- Actions: Check “Change” (and optionally “Delete” if desired)
- Assignment: Add all the users or groups this should apply to
- Constraints: Use this JSON: { “owner__users”: “$user” }
The magic is in that constraint. The $user token is replaced with the current user’s ID at query time. The owner__users path traverses from the device to its owner, then to the owner’s list of user members. This constraint will match devices where the current user is a member of the device’s Owner.
The result
Now, when a user tries to edit a device:
- If they’re a member of that device’s Owner → the change is allowed
- If they’re not a member → they’ll get a permissions error
This is dynamic and automatic. When you assign a new device to an Owner, or add a user to an Owner, the permissions immediately reflect that—no permission reconfiguration required.
Including Group Membership
If your Owners primarily contain user groups rather than individual users, you can expand the constraint to check group membership as well:
This matches if the user is either directly in the Owner’s user list or is a member of any group assigned to the Owner.
Why This Matters
This pattern transforms Owners from a passive documentation feature into an active access control mechanism. Instead of maintaining parallel structures for “who’s responsible” and “who can edit,” they become one and the same. The team responsible for a device is automatically the team who can modify it.
For large organizations, this dramatically simplifies permission management. Onboard a new team member? Just add them to the appropriate Owner. Decommissioning a device? Ownership and permissions go away together. Transfer responsibility for a device to another team? Change the Owner assignment and the permissions follow automatically.
Summary
NetBox 4.5’s Owner feature brings a native, first-class way to track responsibility for your infrastructure. We’ve seen how you can create an Owner that combines users and groups, assign it to devices (and other objects), and then easily filter or review those assignments. No more spreadsheets or custom fields to maintain.
But Owners go beyond documentation. By leveraging permission constraints with the $user token, you can turn ownership into delegated administration: teams can only modify the devices they own, and permissions update automatically as ownership changes. This unifies “who’s responsible” and “who can edit” into a single, maintainable system.
Whether you’re using Owners simply to document responsibility or to power team-based access control, this feature offers a cleaner approach to managing accountability in your network. Give it a try and see how it fits your workflow.
