Backup and Restore in Depth
Embedded Cluster only
This page has the full disaster recovery procedures for Embedded Cluster installs, with every check and every edge case. For the short version, see Backup Essentials. For Helm installs, see Helm Backups. The manual backup section applies to both install paths.
This page uses three kinds of backup:
| Term | Meaning | Schedule |
|---|---|---|
| Disaster recovery backup | A Velero backup of the whole install, which you make from the admin console. | None by default. See Schedule disaster recovery backups. |
| PostgreSQL backup | A pgBackRest backup of the built-in database, in a repository volume in the cluster. | On by default. See PostgreSQL backup schedule. |
| Manual backup | A copy of your data that you make with kubectl, such as a database dump. | None. See Manual backup and restore. |
A disaster recovery backup includes the repository volume, so it also holds the PostgreSQL backups. See PostgreSQL Backups and Disaster Recovery. The repository and the other volumes share the disk of the node, and their sizes are not limits. See Volume sizes and disk space.
Like NetBox, NetBox Enterprise uses two main datastores: PostgreSQL and Redis.
PostgreSQL holds the primary NetBox model data, such as sites, facilities, and racks.
Redis holds the internal cache and the task queue.
For each datastore, you can use the built-in deployment, or an external resource that already exists in your environment.
External databases
If you supply your own databases for NetBox Enterprise, you must also supply your own procedures for high availability, backup, and restore.
Do you run 2.2.x with external PostgreSQL?
On the 2.2.x line, an install with external PostgreSQL does not detect that a restore removed the nbe_ready migration sentinel.
NetBox and the worker can then stop at startup.
See Known Issues for 2.2.1 for the symptom and the recovery steps.
Upgrade to 2.3.0 before you restore.
Installs on 2.3.0 or later, and installs with the built-in PostgreSQL, do not have this problem.
Disaster recovery backups
A disaster recovery backup keeps the complete state of your NetBox Enterprise install: the volumes, the databases, and the configuration.
NetBox Enterprise includes this feature. For a KOTS install, you must install some more dependencies in your cluster to enable it.
The database comes back from pgBackRest, not from the volume copy
From 2.3.0, a disaster recovery backup excludes the PostgreSQL data volume on purpose. A completed disaster recovery restore therefore always leaves that volume empty. The operator then rebuilds the database from the PostgreSQL backups in the repository.
Before you use the steps below, know these three facts:
- A disaster recovery backup from before 2.3.0 does not hold the database. After you upgrade, take a full PostgreSQL backup immediately, and then a disaster recovery backup.
- A healthy cluster after a disaster recovery restore does not prove that your data came back. Confirm the row counts.
- If you turn off PostgreSQL backups, disaster recovery backups do not hold the database.
Read PostgreSQL Backups and Disaster Recovery before you test a disaster recovery restore.
Back up the NetBox Enterprise installation
Give each cluster its own backup location
If you have more than one NetBox Enterprise cluster, such as production and staging, give each one a unique Prefix in the backup settings below, or a separate bucket. Clusters that share a bucket and a prefix write their disaster recovery backups into one location. The restore prompt cannot tell these disaster recovery backups apart. See Restore the NetBox Enterprise installation.
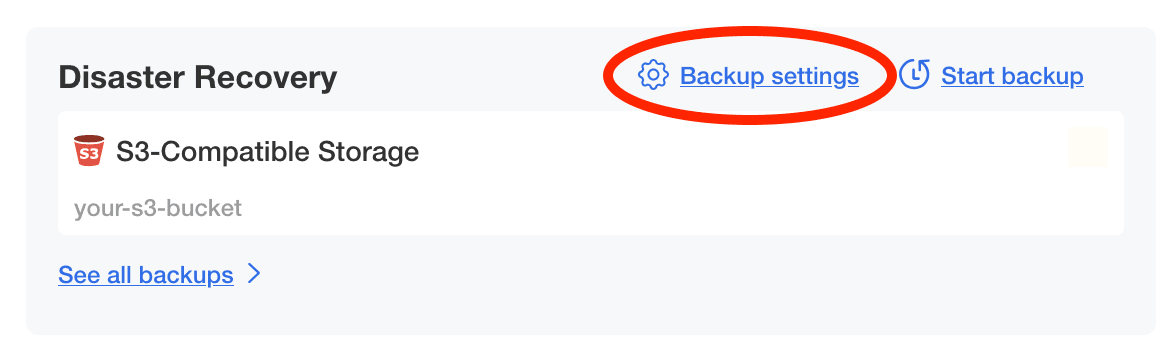
- In the Disaster Recovery section of the admin console, click the ^^Backup settings^^ link.
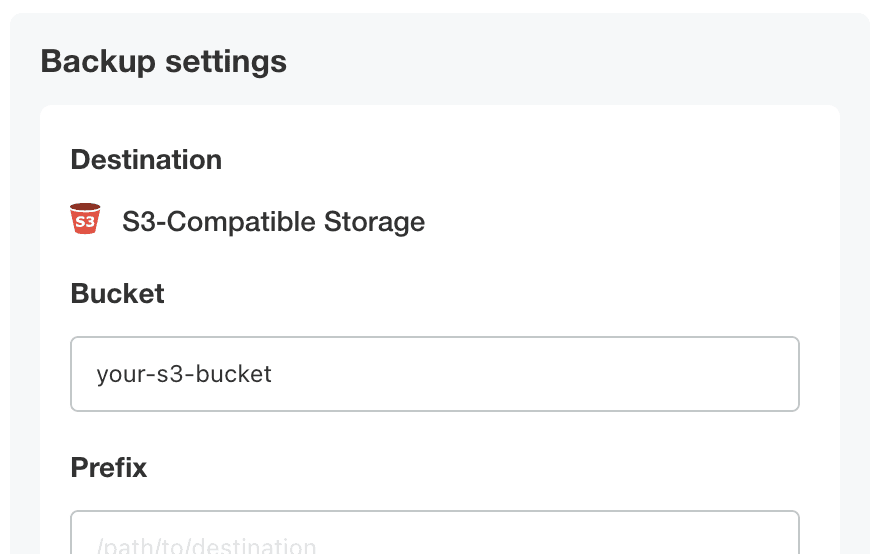
- Enter your S3 bucket, credentials, endpoint, and region.
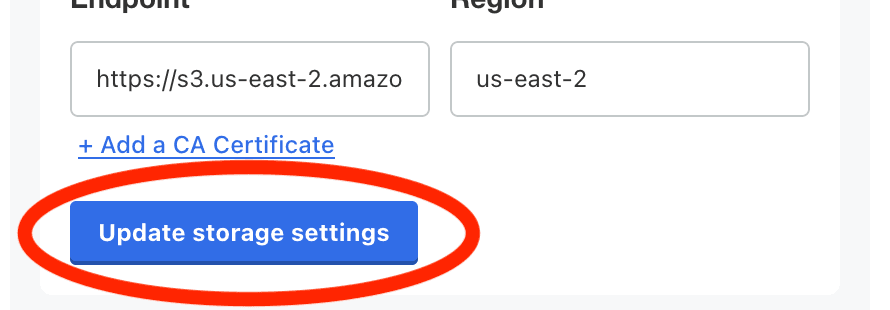
- Click Update storage settings. The admin console takes a few moments to validate your settings.
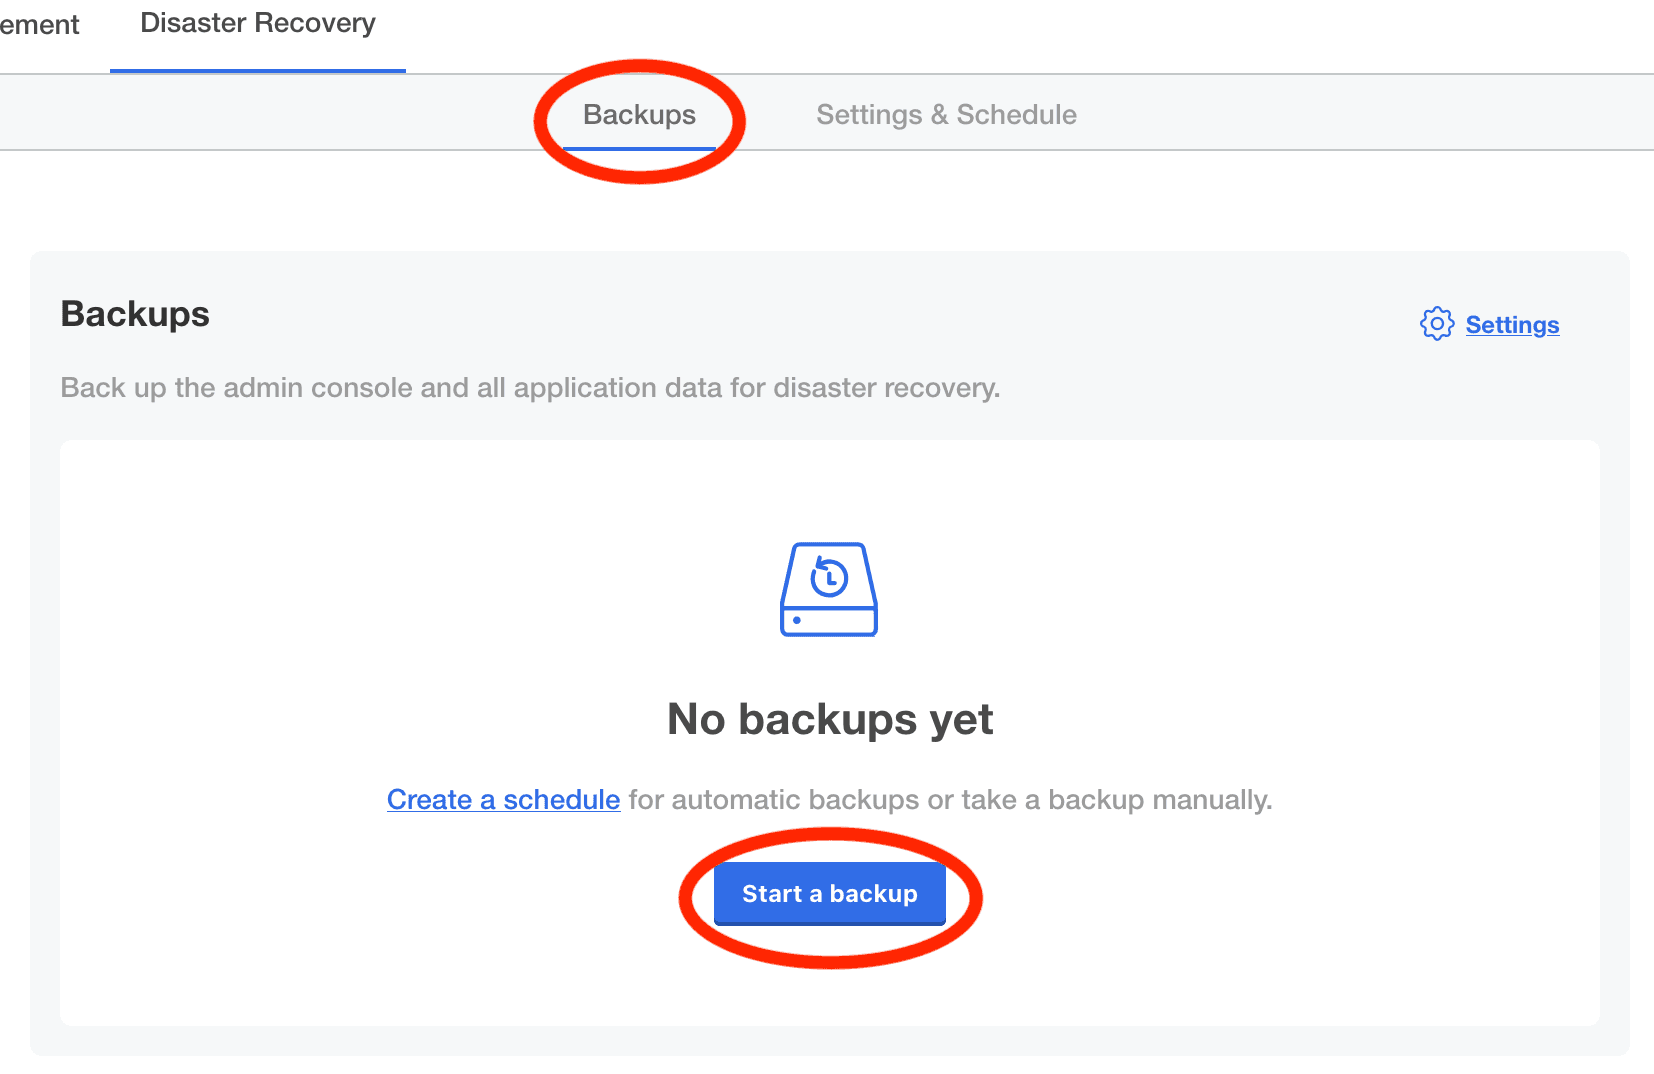
- To make a disaster recovery backup now, click the Backups tab, and then click Start a backup.
- Set a schedule for disaster recovery backups. See Schedule disaster recovery backups.
Schedule disaster recovery backups
Disaster recovery backups have no schedule by default. Without a schedule, you have only the disaster recovery backups that you start manually. A disaster recovery restore returns the install at about the time of the disaster recovery backup, so this schedule sets how much data a disaster recovery restore can lose.
PostgreSQL backups are different. They run on a schedule by default, but they stay in the cluster, so they do not protect against the loss of the cluster. See PostgreSQL backup schedule.
- In the admin console, click Disaster Recovery, and then click the Settings & Schedule tab.
- In the Scheduled backups card, select Enable scheduled backups.
- In Schedule, select Hourly, Daily, or Weekly. For a different interval, type a standard five-field cron expression in Cron expression.
- Click Update schedule. The page shows Schedule updated.
The presets use these cron expressions:
| Schedule | Cron expression |
|---|---|
| Hourly | 0 * * * * |
| Daily | 0 0 * * * |
| Weekly | 0 0 * * MON |
The Retention policy card on the same tab sets how long Velero keeps each disaster recovery backup. Enter a number and a unit, and then click Update retention policy. The default is 1 month. The retention applies to disaster recovery backups that you start manually and to scheduled ones. A change applies to the disaster recovery backups that start after the change.
If Velero does not run, or no storage destination is set, the tab shows Scheduling not active.
The admin console runs the schedule itself.
It does not create a Velero Schedule resource, so velero schedule get shows no schedule.
Each scheduled run creates Velero Backup resources in the velero namespace.
S3-compatible stores that reject trailing checksums
Some S3-compatible stores reject the trailing checksum that the Velero AWS plugin adds to each upload.
The plugin sends it as x-amz-content-sha256: STREAMING-UNSIGNED-PAYLOAD-TRAILER.
With such a store, every disaster recovery backup fails with this error:
api error InvalidArgument: x-amz-content-sha256 must be UNSIGNED-PAYLOAD, STREAMING-AWS4-HMAC-SHA256-PAYLOAD or a valid sha256 value.Known issue: the workaround does not work on 2.4.0
2.4.0 ships Velero AWS plugin v1.14.2, which adds the checksum whatever the value of checksumAlgorithm.
If your store rejects trailing checksums, do not upgrade past 2.3.x until a release with the fix is available.
See Known Issues for 2.4.0.
On 2.3.x and earlier, set checksumAlgorithm: "" in the Velero BackupStorageLocation config to turn off the checksum.
The Backup settings screen has no field for it.
After you save your backup settings, set it from the NetBox Enterprise shell:
/var/lib/embedded-cluster/bin/netbox-enterprise shellkubectl -n velero patch backupstoragelocation default --type merge \
-p '{"spec":{"config":{"checksumAlgorithm":""}}}'Two actions remove the key.
After either one, disaster recovery backups fail until you run the kubectl patch command again:
- You save the Backup settings in the admin console (Update storage settings). The admin console writes the BackupStorageLocation config again with only the fields on that screen.
- You run
netbox-enterprise restore. The restored cluster gets a new BackupStorageLocation without the key.
Restore the NetBox Enterprise installation
This procedure is a disaster recovery restore. It returns the whole install from a disaster recovery backup, in two parts. First, the installer restores the disaster recovery backup. Then the operator does a PostgreSQL restore from the repository. The second part is the same on both install paths. See Disaster recovery restore procedure.
Confirm the installer matches your newest disaster recovery backup
sudo ./netbox-enterprise restore does not offer every disaster recovery backup in the store.
It compares each one with the application version and the Embedded Cluster version in the installer binary on disk.
It removes each one that does not match from the list.
An upgrade through the Admin Console does not replace the installer binary or those versions. On an upgraded cluster, the restore therefore hides every disaster recovery backup taken after the original install.
Embedded Cluster shows its reasons only when no disaster recovery backup passes the filter.
When one old backup passes, the newer ones disappear with no message.
The prompt then shows Found 1 restorable backup!.
If you accept it, the cluster returns to its original-install state, and every later change is lost.
The filter does not limit the list to this cluster. A backup store holds the disaster recovery backups of every cluster that writes to it. The restore lists all of them, offers the newest, and shows a name and a timestamp:
○  Found 2 restorable backups!
Restore from backup "netbox-enterprise-019814bb" (2026-09-01 13:55:40 UTC)?  [Y/n]:
Neither field identifies the cluster that made the backup. If you accept the disaster recovery backup of another cluster, the restore completes, reports success, and brings the cluster up with the data of the other cluster. No error occurs.
Give each cluster its own bucket, or its own prefix in one bucket. Do this when you configure the backup storage location. At restore time, the store already holds disaster recovery backups from more than one cluster.
If you use a shared store, read the cluster ID and the versions from the disaster recovery backup before you accept it.
One disaster recovery backup is two Velero Backups, instance-<id> and application-<id>, and the store has a folder for each.
Replace <name> with one of these folder names, not with the name in the restore prompt.
The first line of the output is the name that the restore prompt shows, so you can match the two:
set -o pipefail   # without this the pipeline reports jq's status, not the copy's

# For an S3-compatible store, also give your endpoint: --endpoint-url <url>
aws s3 ls s3://"$BUCKET"/"$PREFIX"/backups/

aws s3 cp s3://"$BUCKET"/"$PREFIX"/backups/<name>/velero-backup.json - \
  | jq -er '.metadata.labels["replicated.com/backup-name"],
            .metadata.annotations["kots.io/embedded-cluster-id"],
            .metadata.annotations["kots.io/apps-versions"],
            .metadata.annotations["kots.io/embedded-cluster-version"]'
You must get four lines that are not empty. If you do not, stop.
This command is your only check against a restore of the data of another cluster.
Without the two flags above, the command cannot fail visibly.
A failed aws s3 cp writes to stderr, and the pipeline still exits 0.
A missing annotation makes plain jq -r print null and exit 0.
set -o pipefail shows the copy failure, and jq -e exits with a non-zero status on null.
Blank lines, null, or a non-zero exit status mean that the lookup failed.
They do not mean that the backup has no labels.
Correct the credentials, the bucket, or the object name, and run the command again.
When you have four values, compare the cluster ID with the cluster that you restore. Compare the two versions with your installer binary. If they are different, download the installer that matches the newest disaster recovery backup before you start.
This object path is the internal layout of Velero. NetBox Enterprise does not document it or depend on it. The lookup works, but it is not supported.
Prepare the host
Run the disaster recovery restore on a host that has no cluster.
Make sure that the disaster recovery backup holds data before you reset the host
On a single-node Embedded Cluster, reset deletes the PostgreSQL data volume and the repository.
After the reset, the disaster recovery backup in your object store is the only copy of your database.
A disaster recovery backup can report Completed and hold no volume data.
A hostPath storage class causes this, and it shows no warning.
Confirm both of these items before you reset. Use the name of the disaster recovery backup that the admin console shows:
# The name that the admin console and the restore prompt show, such as
# netbox-enterprise-007caca9. It labels two Velero Backups.
NAME=<name>

# 1. Both Velero Backups completed: instance-<id> and application-<id>.
kubectl -n velero get backup -l replicated.com/backup-name="$NAME" \
  -o custom-columns='NAME:.metadata.name,PHASE:.status.phase'

# 2. The application Backup holds volume data: one Completed row per volume,
#    and the pgBackRest repository volume (repo1) with a non-zero byte count.
APP_BACKUP="$(kubectl -n velero get backup -l replicated.com/backup-name="$NAME" \
  -o name | grep '/application-' | cut -d/ -f2)"
kubectl -n velero get podvolumebackups -l velero.io/backup-name="$APP_BACKUP" \
  -o custom-columns='VOLUME:.spec.volume,PHASE:.status.phase,BYTES:.status.progress.bytesDone'
One disaster recovery backup is two Velero Backups.
instance-<id> holds the admin console, and application-<id> holds the NetBox Enterprise volumes.
If the first command shows no rows, the name is wrong.
If the second command shows no rows, or no repo1 row, the disaster recovery backup does not hold your database.
Do not reset.
See Verifying backups are working.
To restore onto the same machine, run sudo ./netbox-enterprise reset --yes first.
The reset reboots the host, so your SSH session disconnects, and the command reports a non-zero status.
This status is not a failure.
When the host is up again, connect again, and confirm that the host is empty.
Check the files and services that the installer leaves, not only the binary.
A $PATH check passes after a reset that removed the binary but left the data directories:
for p in /var/lib/embedded-cluster /var/lib/k0s /etc/k0s; do
  [ -n "$(sudo ls -A "$p" 2>/dev/null)" ] && echo "not empty: $p"
done
systemctl list-units --all 'k0s*' --no-legend | grep . && echo "k0s units remain"
command -v k0s >/dev/null && echo "k0s binary still on PATH"
echo "check complete"
The reset can leave /var/lib/embedded-cluster and /etc/k0s as empty directories.
Empty directories do not stop the restore, so the check reports only a directory that has content.
A line before check complete means that the host is not empty.
Run the reset again, or remove the named path manually.
Run the restore
- If you do not have it yet, download the installer that matches your disaster recovery backup. Use the same instructions as for a new install.
- Run:
sudo ./netbox-enterprise restore - Enter the S3 credentials that you use for disaster recovery backups.
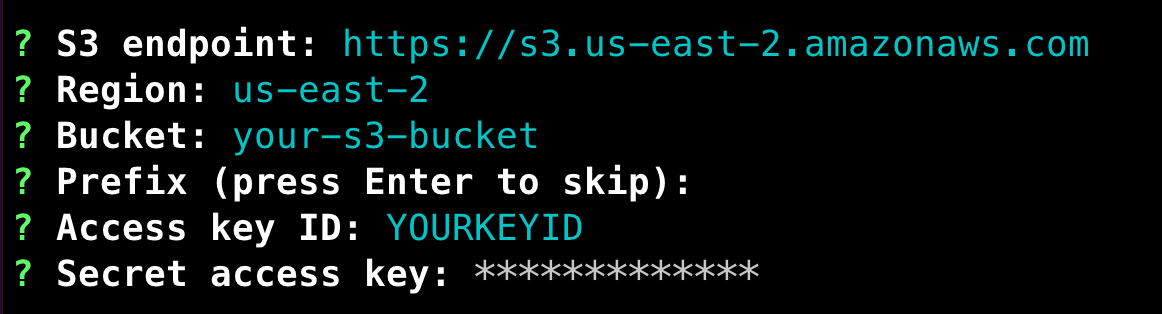
- The installer takes a few minutes to start the node.
When it is ready, it asks you to continue the restore:
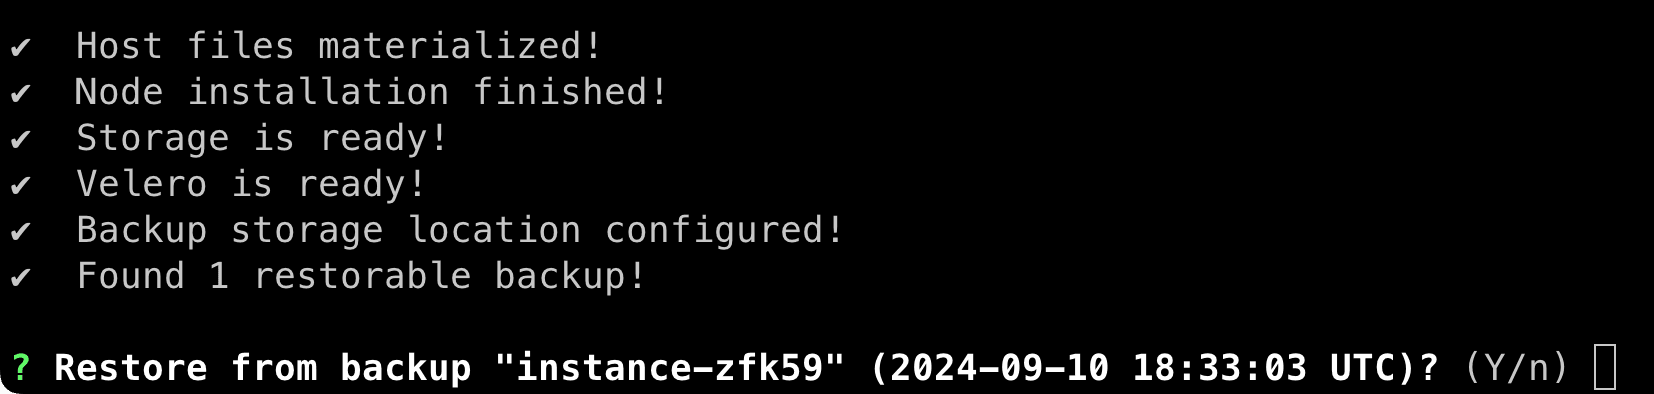
- Make sure that the name matches the disaster recovery backup that you recorded. Then enter
Yto continue. The restore starts the cluster. - (Optional) If you want more than one node in the new cluster, add the nodes in the admin console when it asks you. See High-availability restore.
- Enter
continueto start the NetBox Enterprise application.
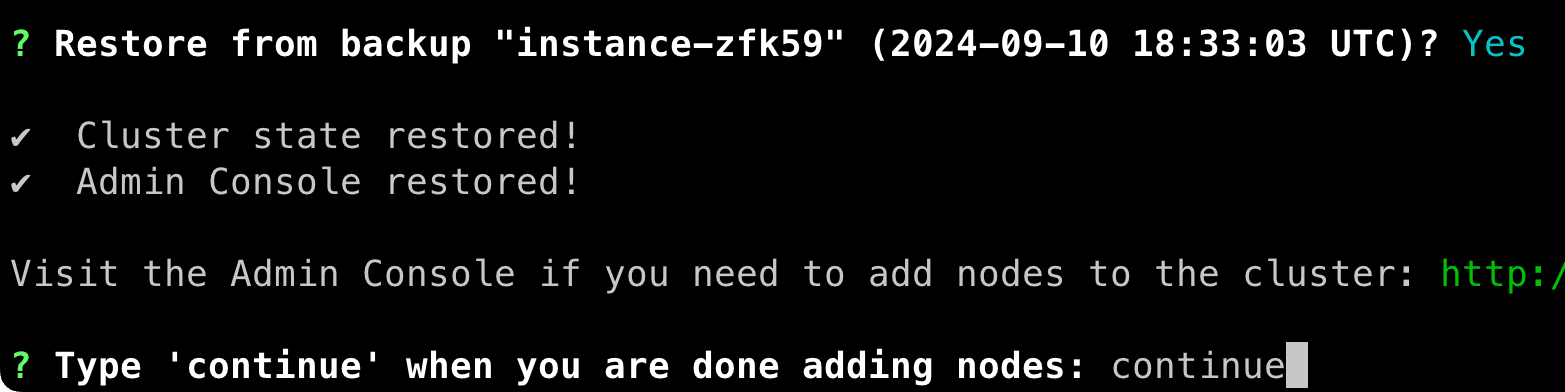
- After a few more minutes, the installer shows "Application restored!"

NetBox Enterprise and the Admin Console are now restored and available. - Confirm that your data came back. "Application restored!" reports on the Velero restore only. Do the checks in Verify, and compare the values with the baseline that you recorded before the loss.
If the cluster comes up healthy but empty, the disaster recovery restore failed. See Disaster recovery restore procedure for the next steps.
High-availability restore
An HA disaster recovery restore stops and waits for you to add the other nodes. After the Admin Console starts, node 1 shows its URL and then waits:
Type 'continue' when you are done adding nodes: You are restoring a
high-availability cluster, which requires at least 3 controller nodes. You
currently have 1. Please add more controller nodes.
The prompt repeats until you answer, so you have time. Add the other nodes while it waits. Get the join command on node 1, then run it on each other node:
# On node 1:
cd && sudo ./netbox-enterprise join print-command

# On each remaining node, using the command it printed:
cd && sudo ./netbox-enterprise join <node-1-ip>:30000 <token> --yes
Use --yes.
Each join runs host preflight checks, and without --yes a warning stops at a prompt.
--yes also confirms the HA prompt on the node that completes the quorum.
--yes also accepts every preflight warning and does not show it.
Read the preflight output of each node before you answer continue on node 1.
A node that joins with a warning about disk space, a kernel setting, or storage can fail later with no message.
When three controller nodes are present, answer continue.
The disaster recovery restore then continues to the application.
Manual backup and restore
Also keep manual backups of your data. Use them to examine your data, to restore part of it, or to move it to another system.
These commands also work on a Helm install. On Helm, use Maintenance Mode in place of the admin console steps. Admin Console Configuration applies to Embedded Cluster only.
NetBox Enterprise Namespace
The default namespace is kotsadm.
The instructions below use kotsadm.
To use a different namespace, change the NETBOX_NAMESPACE variable.
Back up your data
You can back up the NetBox Enterprise data manually with kubectl.
Before you start: get access to your cluster
You must have command-line access to the cluster before you can back it up.
See the advanced tools documentation to connect to your NetBox Enterprise cluster.
Media, Scripts, and Reports
The runtime files are on a volume that the NetBox containers can read. To back them up, run this command:
NETBOX_NAMESPACE="$(kubectl get deployments \
  -A -l 'app.kubernetes.io/component=netbox' \
  -ojsonpath='{.items[0].metadata.namespace}')" && \
NETBOX_MAIN_POD="$(kubectl get pod \
  -o name \
  -n "${NETBOX_NAMESPACE}" \
  -l 'app.kubernetes.io/component=netbox' \
  | head -n 1 \
  )" && \
kubectl exec "${NETBOX_MAIN_POD}" \
  -n "${NETBOX_NAMESPACE}" \
  -c netbox \
  -- /bin/sh -c ' \
      cd /opt/netbox/netbox && \
      find media scripts reports static -type f -not -path "*/.velero/*" > /tmp/files.txt && \
      tar -czf - \
      --owner=0 \
      --group=0 \
      -T /tmp/files.txt' > netbox-data.tar.gz
Built-In PostgreSQL
The CrunchyData Postgres Operator deploys the built-in PostgreSQL.
A dump is for portability, not for disaster recovery
From 2.3.0, a disaster recovery restore rebuilds the built-in database from PostgreSQL backups. PostgreSQL backups run on a schedule, and pgBackRest archives the write-ahead log all the time. A dump is a manual backup: a copy at one point in time, in a portable format. Use a dump to move data to another system, or to examine it. To recover the cluster, use a disaster recovery backup. See PostgreSQL Backups and Disaster Recovery.
The PostgreSQL command-line tools are already in the cluster.
To dump the database, run pg_dump in the correct container.
To dump the database, run these commands:
NETBOX_NAMESPACE="$(kubectl get deployments \
  -A -l 'app.kubernetes.io/component=netbox' \
  -ojsonpath='{.items[0].metadata.namespace}')" && \
NETBOX_DATABASE_FILE="netbox-enterprise.pgsql" && \
POSTGRESQL_MAIN_POD="$(kubectl get pod \
  -o name \
  -n "${NETBOX_NAMESPACE}" \
  -l 'postgres-operator.crunchydata.com/role=master' \
  | head -n 1 \
  )" && \
EXCLUDE_DATABASES="$(kubectl exec "${POSTGRESQL_MAIN_POD}" \
  -n "${NETBOX_NAMESPACE}" \
  -c database \
  -- \
    psql -t -c "SELECT CONCAT('--exclude-database=', datname) \
      FROM pg_database \
      WHERE datname <> ALL ('{netbox,diode,hydra,copilot}')" \
)" && \
kubectl exec "${POSTGRESQL_MAIN_POD}" \
  -n "${NETBOX_NAMESPACE}" \
  -c database \
  -- \
    pg_dumpall \
      $EXCLUDE_DATABASES \
    > "${NETBOX_DATABASE_FILE}"
The commands create a netbox-enterprise.pgsql file in your local directory.
Keep it in a safe location for future restores.
For more information about NetBox database backups, see the official NetBox documentation.
Cluster Secrets
A manual database restore works only if the rest of the cluster can decrypt the data and authenticate to the restored databases. Back up these secrets:
- Operator-managed secrets. These include the NetBox
SECRET_KEYand API token peppers, the generated superuser credentials, the Diode OAuth2 client secret, and the Hydra system secret. - PGO-managed
pgusersecrets. These hold the PostgreSQL password of each user. The passwords match the password hashes in thepg_dumpalloutput.
Run these commands:
NETBOX_NAMESPACE="$(kubectl get deployments \
  -A -l 'app.kubernetes.io/component=netbox' \
  -ojsonpath='{.items[0].metadata.namespace}')" && \
(
  kubectl get secrets \
    --namespace "${NETBOX_NAMESPACE}" \
    --selector 'app.kubernetes.io/managed-by=netbox-operator' \
    --output name; \
  kubectl get secrets \
    --namespace "${NETBOX_NAMESPACE}" \
    --output name \
    | grep -E '/[^/]+-postgres-pguser-[^/]+$'; \
) | sort -u | while read -r SECRET; do \
  echo "---" && \
  kubectl get "${SECRET}" \
    --namespace "${NETBOX_NAMESPACE}" \
    -o yaml \
  | grep -v -E '^  (creationTimestamp|resourceVersion|uid):'; \
done > netbox-enterprise-secrets.yaml
Keep the netbox-enterprise-secrets.yaml file with your netbox-enterprise.pgsql file for future restores.
Before you store it, open the file and make sure that it contains more than one kind: Secret document.
An empty file, or a file with one document, means that the selectors matched nothing in your cluster.
Admin Console Configuration
You can export the current Admin Console configuration as a ConfigValues file.
The file holds all your Admin Console settings in portable YAML, such as database connections, TLS configuration, and feature toggles.
Use it when you move to a new host or install again.
From the cluster shell, run:
kubectl exec deploy/kotsadm -n kotsadm -- \
  /kots get config --current --decrypt --namespace kotsadm \
  > netbox-enterprise-config.yaml
The --decrypt flag writes password fields, such as database credentials, in plain text, not encrypted.
Keep this file in a secure location with your other backups.
To apply a saved configuration to a new install, run:
kubectl exec -i deploy/kotsadm -n kotsadm -- \
  /kots set config netbox-enterprise \
    --config-file /dev/stdin --deploy --namespace kotsadm \
  < netbox-enterprise-config.yaml
Restore your backups
Put NetBox Enterprise into maintenance mode before you restore.
Enable and disable maintenance mode
- Go to the Config tab, and select Enable Maintenance Mode.
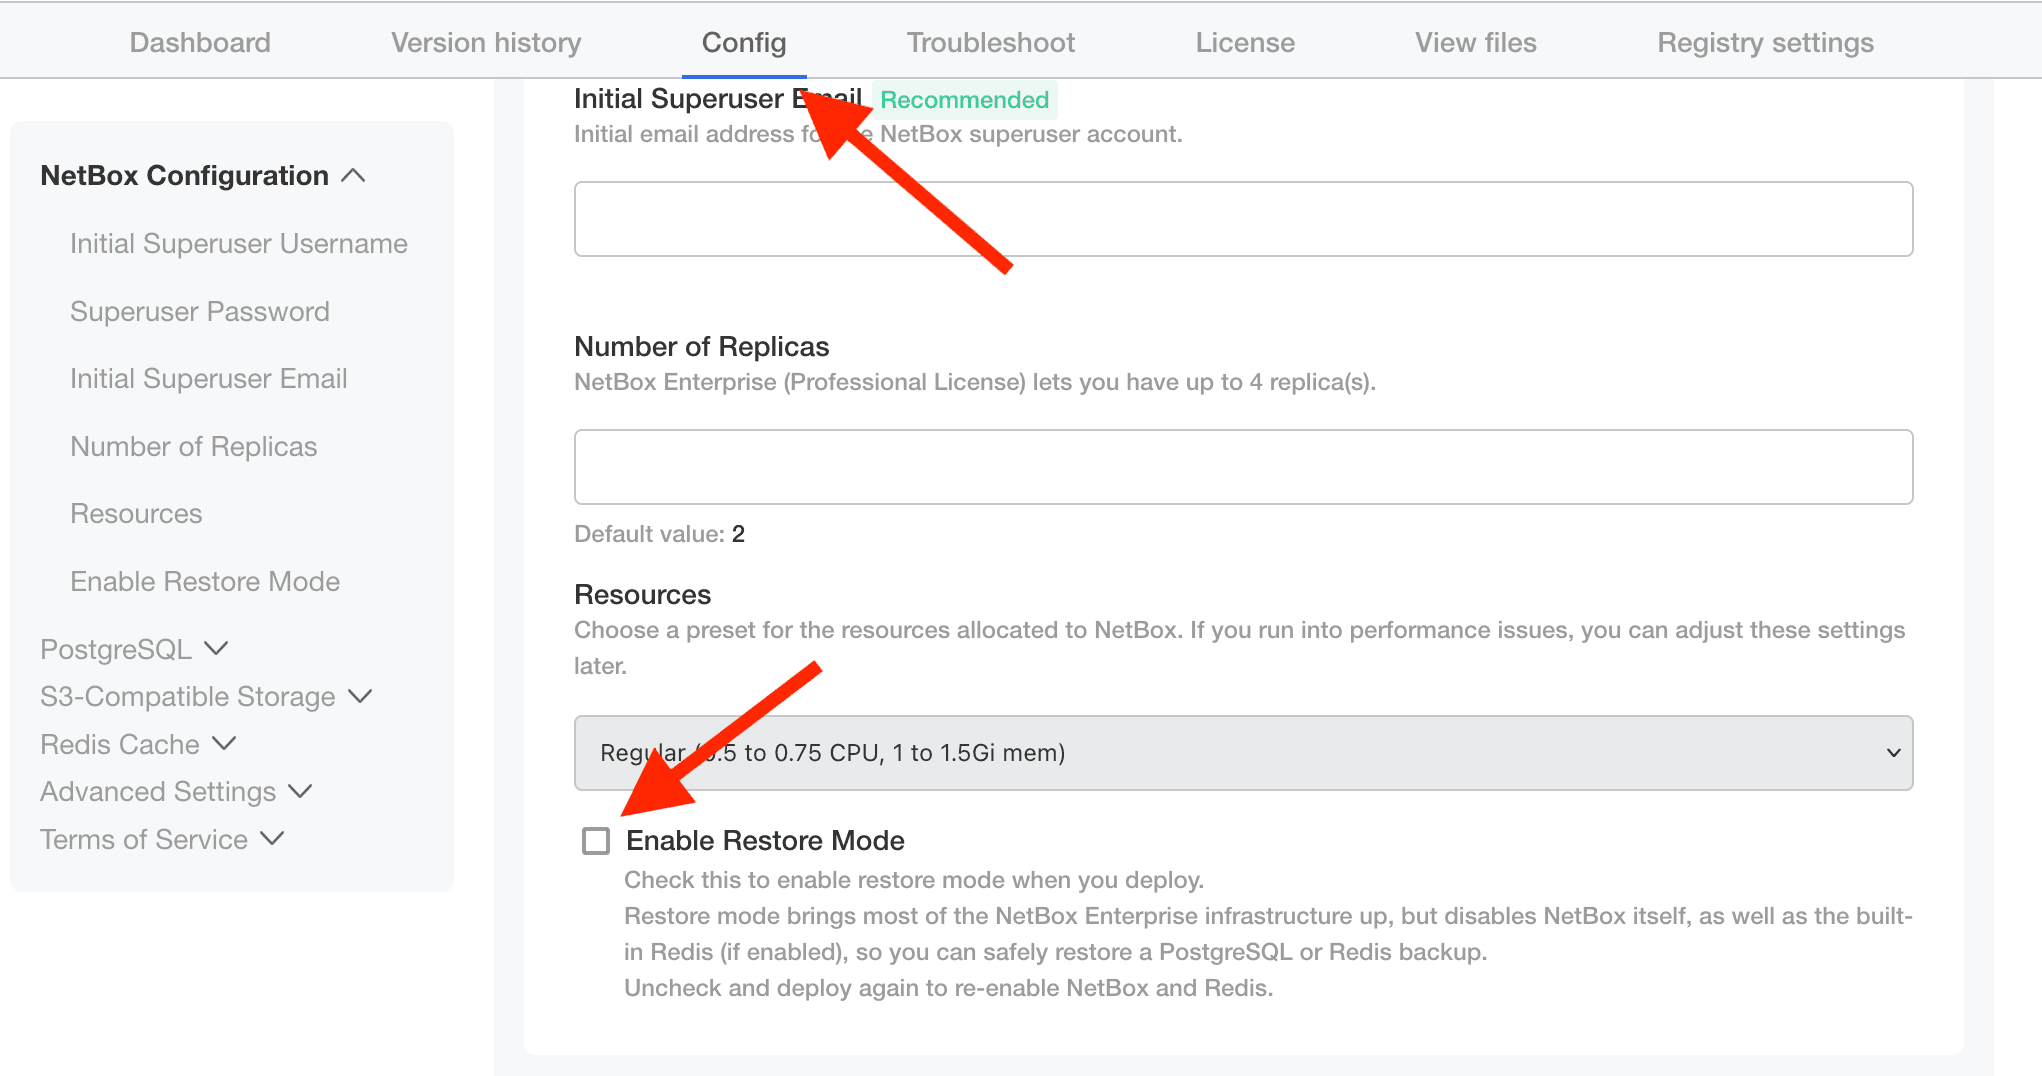
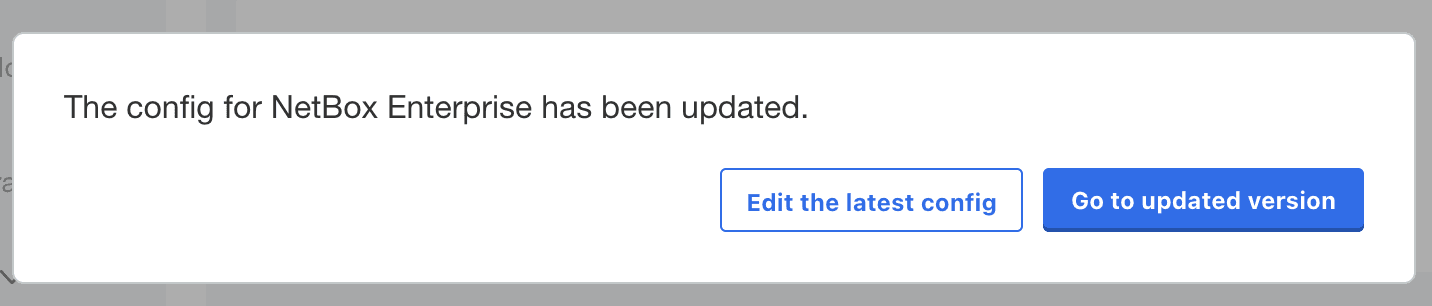
- Click the "Save config" button at the bottom of the form. When the admin console asks you, click "go to updated version".
- Make sure that the New version available message at the top shows a config change. If it does, click the "Deploy" button.
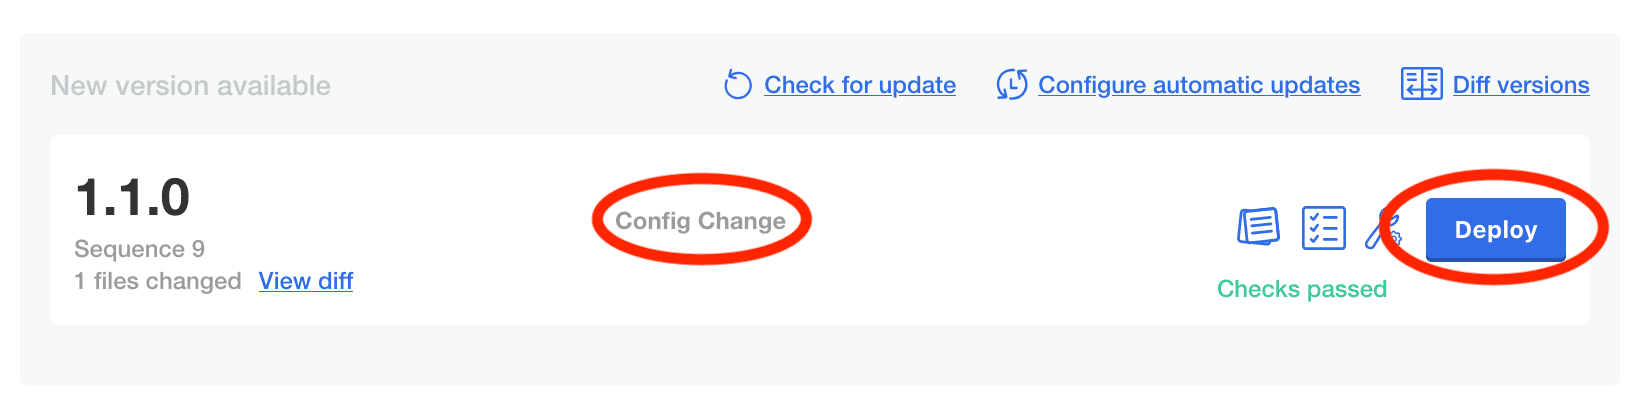
This stops NetBox but keeps the other NetBox Enterprise infrastructure running, so you can restore safely.
When the restore is complete, do the same steps again: clear Enable Maintenance Mode, and deploy the updated configuration.
Media, Scripts, and Reports
To restore media, scripts, and reports, unpack them into the correct directory in a NetBox container.
The backup instructions above put the media/, scripts/, and reports/ subdirectories into one file.
A backup from a different NetBox instance can have a different tarball name, or need a different path after -C at the end of this command.
In that case, change them so that the backup unpacks into the correct location.
NETBOX_NAMESPACE="$(kubectl get deployments \
  -A -l 'app.kubernetes.io/component=netbox' \
  -ojsonpath='{.items[0].metadata.namespace}')" && \
NETBOX_MAINTENANCE_POD="$(kubectl get pod \
  -o name \
  -n "${NETBOX_NAMESPACE}" \
  -l 'maintenance-mode=true' \
  | head -n 1 \
  )" && \
cat netbox-data.tar.gz | kubectl exec ${NETBOX_MAINTENANCE_POD} \
  -n "${NETBOX_NAMESPACE}" \
  -i \
  -- tar -xvzf - \
    --exclude=.velero \
    --exclude=reports/__init__.py \
    --no-same-owner \
    --no-same-permission \
    -C /opt/netbox/netbox
Cluster Secrets
Restore the secrets before the database dump. The operator and PGO need them, so that pods can decrypt session data, authenticate to PostgreSQL, and serve Diode OAuth flows against the restored data.
NETBOX_NAMESPACE="$(kubectl get deployments \
  -A -l 'app.kubernetes.io/component=netbox' \
  -ojsonpath='{.items[0].metadata.namespace}')" && \
kubectl apply \
  --server-side \
  --force-conflicts \
  --namespace "${NETBOX_NAMESPACE}" \
  --filename netbox-enterprise-secrets.yaml
Then restart the pods that use the old secret values, so that they get the restored credentials:
kubectl rollout restart deployment \
  --namespace "${NETBOX_NAMESPACE}" \
  -l 'app.kubernetes.io/managed-by=netbox-operator'
Built-In PostgreSQL
To restore from a dump file, send the netbox-enterprise.pgsql file from the backup to psql in the PostgreSQL pod:
NETBOX_NAMESPACE="$(kubectl get deployments \
  -A -l 'app.kubernetes.io/component=netbox' \
  -ojsonpath='{.items[0].metadata.namespace}')" && \
NETBOX_DATABASE_FILE="netbox-enterprise.pgsql" && \
DIODE_DEPLOYMENT_COUNT="$(kubectl get deployments -n "${NETBOX_NAMESPACE}" -o name | grep -c diode || :)" && \
HYDRA_DEPLOYMENT_COUNT="$(kubectl get deployments -n "${NETBOX_NAMESPACE}" -o name | grep -c hydra || :)" && \
POSTGRESQL_MAIN_POD="$(kubectl get pod \
  -o name \
  -n "${NETBOX_NAMESPACE}" \
  -l 'postgres-operator.crunchydata.com/role=master' \
  | head -n 1 \
  )" && \
for DB in netbox diode hydra copilot; do
  kubectl exec "${POSTGRESQL_MAIN_POD}" \
    -n "${NETBOX_NAMESPACE}" \
    -c database \
    -- dropdb --if-exists --force "${DB}"; \
done && \
( \
  if [ "${DIODE_DEPLOYMENT_COUNT}" -gt 0 ]; then \
    echo "CREATE DATABASE diode WITH TEMPLATE = template0 ENCODING = 'UTF8';"; \
  fi && \
  if [ "${HYDRA_DEPLOYMENT_COUNT}" -gt 0 ]; then \
    echo "CREATE DATABASE hydra WITH TEMPLATE = template0 ENCODING = 'UTF8';"; \
  fi && \
  if grep -q '^\\connect copilot$' "${NETBOX_DATABASE_FILE}"; then \
    echo "CREATE DATABASE copilot WITH TEMPLATE = template0 ENCODING = 'UTF8';"; \
  fi && \
  echo "CREATE DATABASE netbox WITH TEMPLATE = template0 ENCODING = 'UTF8';"; \
) \
| kubectl exec "${POSTGRESQL_MAIN_POD}" \
  -n "${NETBOX_NAMESPACE}" \
  -i \
  -c database \
    -- psql -d template1 -f- && \
grep -v -E '^(ALTER|CREATE|DROP) (DATABASE|ROLE) ' "${NETBOX_DATABASE_FILE}" \
| kubectl exec "${POSTGRESQL_MAIN_POD}" \
  -n "${NETBOX_NAMESPACE}" \
  -i \
  -c database \
    -- psql -d netbox -f-
Then run this command to set the correct database permissions:
NETBOX_NAMESPACE="$(kubectl get deployments \
  -A -l 'app.kubernetes.io/component=netbox' \
  -ojsonpath='{.items[0].metadata.namespace}')" && \
POSTGRESQL_MAIN_POD="$(kubectl get pod \
  -o name \
  -n "${NETBOX_NAMESPACE}" \
  -l 'postgres-operator.crunchydata.com/role=master' \
  | head -n 1 \
  )" && \
for DB in $(kubectl exec "${POSTGRESQL_MAIN_POD}" \
  -n "${NETBOX_NAMESPACE}" \
  -c database \
  -- \
    psql -t -c "SELECT datname FROM pg_database WHERE datname IN ('netbox', 'hydra', 'diode', 'copilot');"; \
); do \
  kubectl exec "${POSTGRESQL_MAIN_POD}" \
  -n "${NETBOX_NAMESPACE}" \
  -i \
  -c database \
  -- \
    psql --dbname "${DB}" -e -c "\
      ALTER DATABASE ${DB} OWNER TO ${DB}; \
      GRANT ALL PRIVILEGES ON DATABASE ${DB} TO ${DB}; \
      GRANT CREATE ON SCHEMA public TO ${DB}; \
      GRANT ALL PRIVILEGES ON ALL FUNCTIONS IN SCHEMA public TO ${DB}; \
      GRANT ALL PRIVILEGES ON ALL SEQUENCES IN SCHEMA public TO ${DB}; \
      GRANT ALL PRIVILEGES ON ALL TABLES IN SCHEMA public TO ${DB}; \
    "; \
done
Backup Essentials
The short version of backup and restore for an Embedded Cluster install. Set up disaster recovery backups once, check them, and restore on a new host.
PostgreSQL Backups and Disaster Recovery
The built-in PostgreSQL uses pgBackRest for PostgreSQL backups. This page covers disaster recovery, PostgreSQL backups, and how the two work together.