NetBox Enterprise Multi-Node Deployment
NetBox Enterprise Multi-Node enables high-availability (HA) deployments by distributing NetBox across multiple servers in an active-active configuration. This provides zero-downtime maintenance, automatic failover, and horizontal scaling.
High Availability Overview
Multi-Node deployment uses Kubernetes to distribute NetBox pods across multiple physical or virtual machines:
- Active-Active Configuration: All nodes actively serve traffic simultaneously
- Automatic Failover: If a node fails, traffic automatically routes to healthy nodes without manual intervention
- Zero Downtime: Perform maintenance, upgrades, or node replacements without service interruption
- Horizontal Scaling: Add nodes as usage grows to distribute load
Multi-Node deployment is included in the Premium tier, supporting up to 3 nodes (with additional nodes available). For pricing, see the NetBox Labs pricing page or contact sales.
Before deploying, review the HA Infrastructure Requirements for node topology, latency, bandwidth, and security prerequisites.
Requirements
Multi-Node deployments add two requirements compared to single-node installations. The first is shared object storage for NetBox media, in place of a node-local volume. You can satisfy this with external S3-compatible storage, or, from 2.3.0, with in-cluster object storage.
In-cluster object storage (2.3.0 and later): NetBox Enterprise provisions and manages the object store for you on three or more nodes with the multi-node entitlement. See In-Cluster Object Storage.
External S3-compatible storage (available in v1.13+):
- Cloud providers: AWS S3, Google Cloud Storage, Azure Blob Storage, DigitalOcean Spaces
- Self-hosted: MinIO, Ceph (with RadosGW), SeaweedFS
- Must be accessible from all nodes
- Requires AWS Signature Version 4 authentication
See Storage Installation for more information.
The second is that the database and cache tiers must also be highly available. External PostgreSQL and Redis satisfy this at any node count. From 2.3.0 the built-in PostgreSQL and Redis are also HA-capable in place, on three or more nodes with the multi-node entitlement - PostgreSQL through Patroni quorum synchronous replication and Redis through a Sentinel quorum. Below three nodes each tier scales to min(node count, 3), so a two-node cluster replicates but does not reach those guarantees; without the entitlement a tier is capped at a single instance at any node count, and does not survive the loss of its node. See High Availability for the per-tier rules.
All other requirements (hardware, OS, network) are the same as single-node installations. See NetBox Enterprise Requirements and HA Infrastructure Requirements.
Installation Steps
Step 1: Install NetBox Enterprise on First Node
Follow the standard NetBox Enterprise Installation Guide on your first node with these considerations:
-
During installation, set the File Storage Backend when prompted - either In-Cluster Object Storage (2.3.0 and later) or External S3-Compatible Storage. Node-local storage cannot be shared across nodes.
If you choose in-cluster object storage, expect it to be unprotected until the cluster reaches three nodes. The store comes up and serves normally on the first node, but its three replicas have nowhere to spread to, so losing that node loses the store — and the
NetBoxEnterpriseresource reportsInClusterStorageBelowNodeGateuntil you finish adding nodes. That is expected during a multi-node build-out; it is not a state to leave a deployment in. -
Set Replicas to
1for initial deployment -
Decide how the database and cache tiers run - external PostgreSQL and Redis, or the built-in ones in HA mode at three or more nodes with the multi-node entitlement (see HA Infrastructure Requirements)
Complete the installation and verify NetBox is accessible and functioning correctly.
Step 2: Add Nodes to the Cluster
-
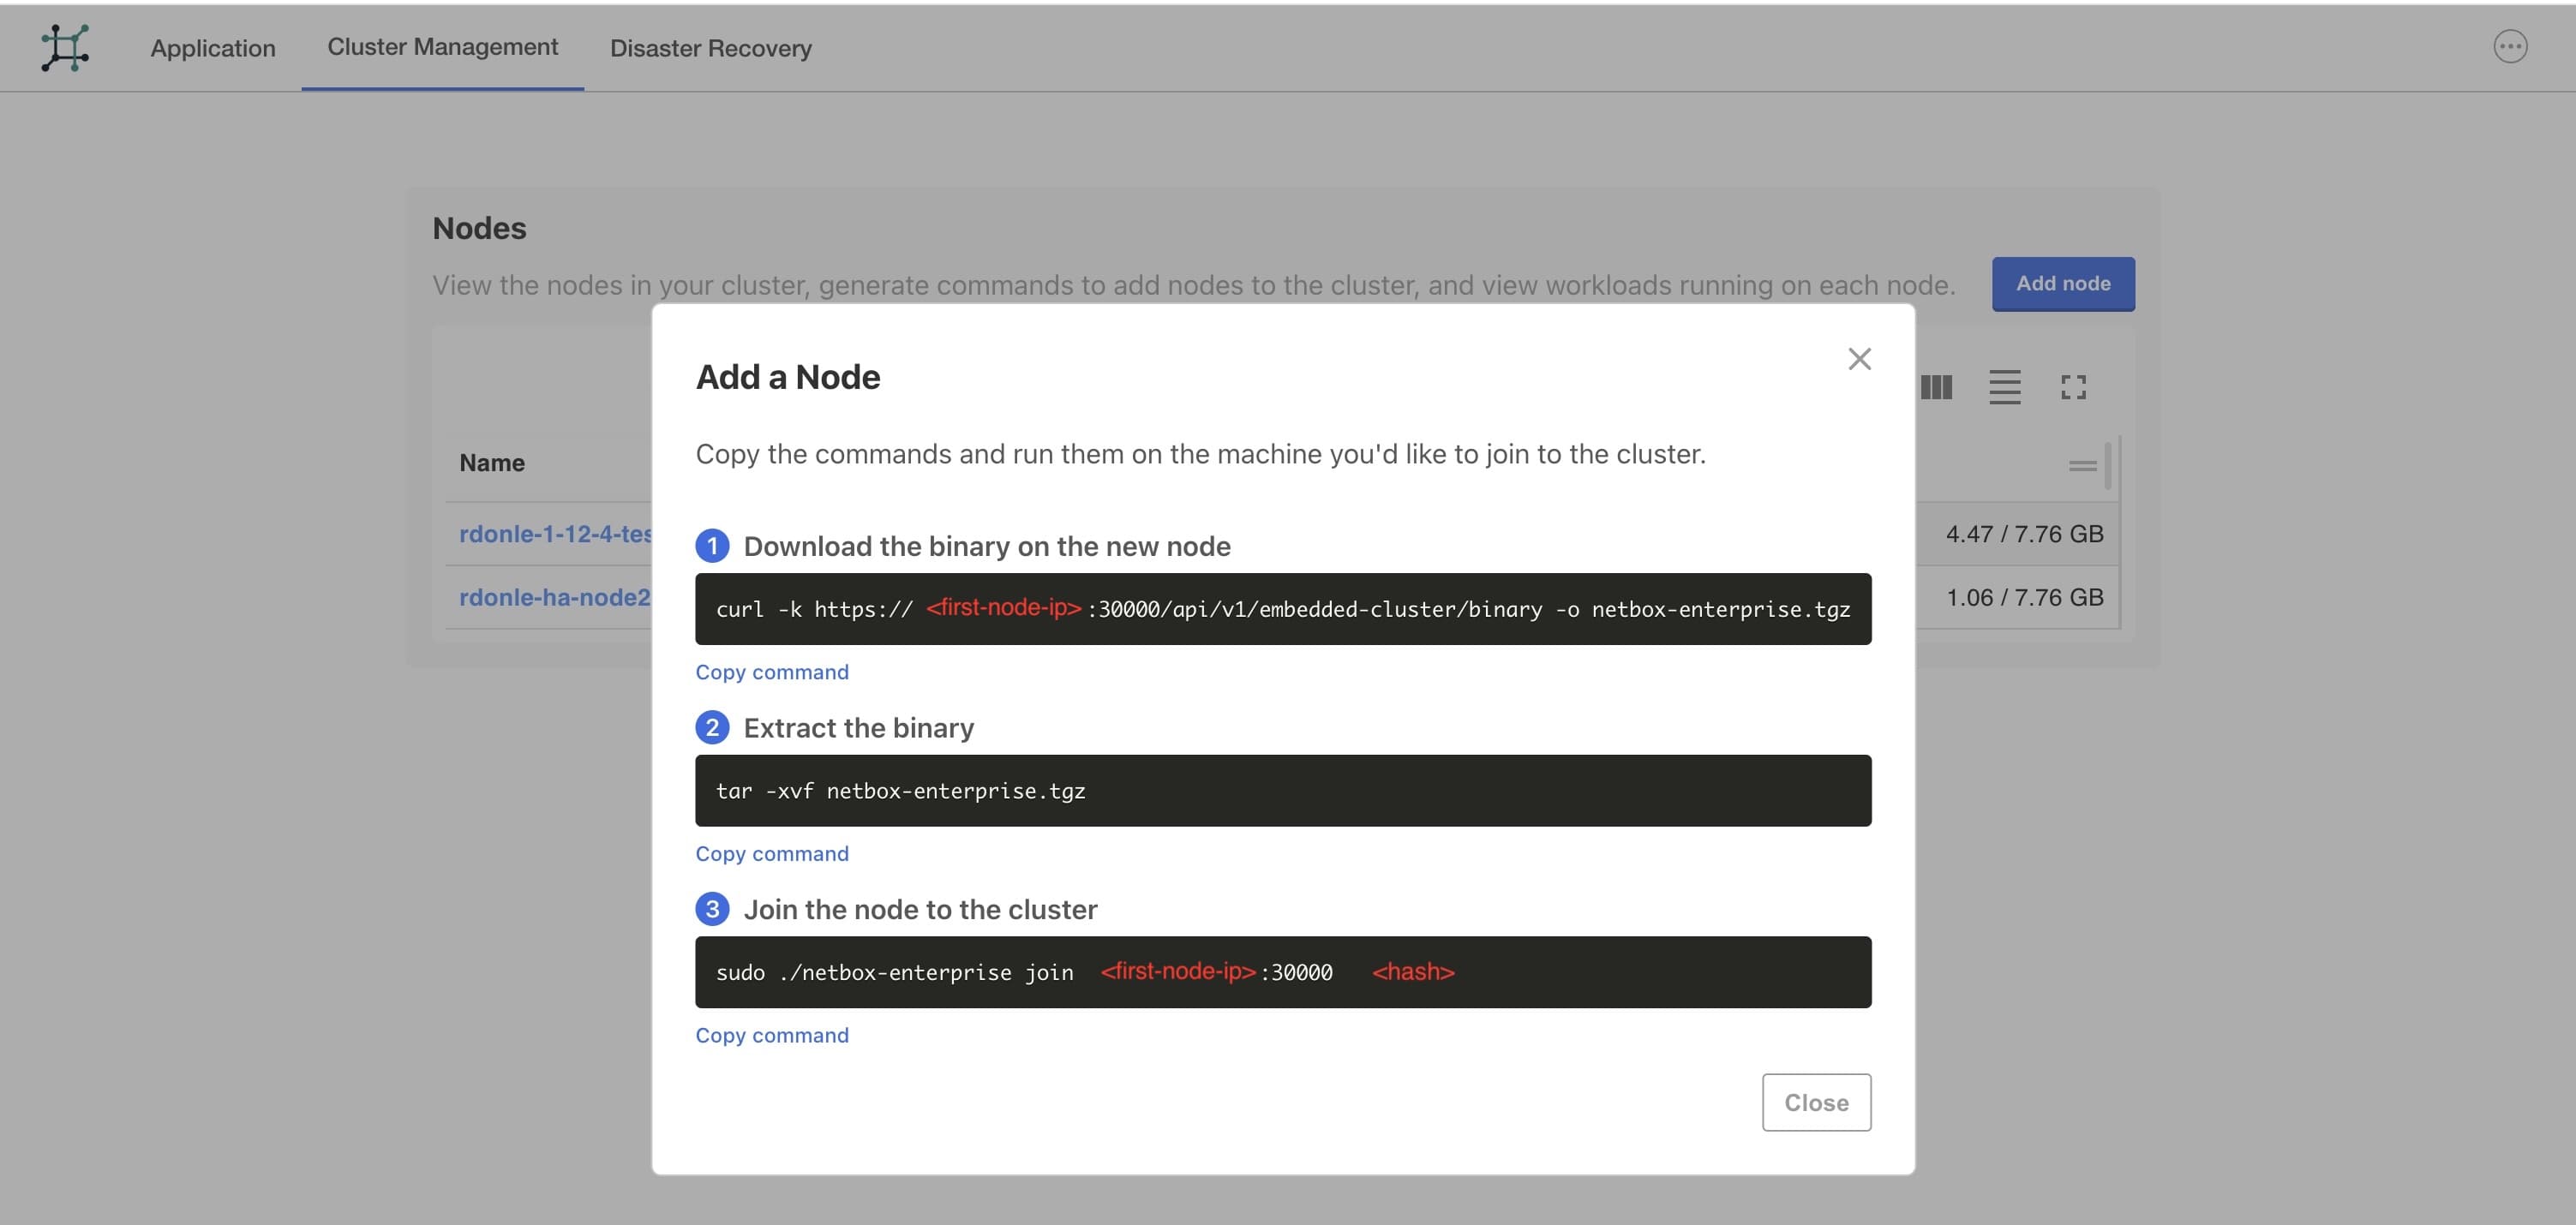
Access the Admin Console at
https://<first-node-ip>:30000/ -
Navigate to Cluster Management tab
-
Click Add node button to generate join commands
-
On each new node, run the provided commands:
# Download the binary
curl -k https://<first-node-ip>:30000/api/v1/embedded-cluster/binary -o netbox-enterprise.tgz

# Extract the binary
tar -xvf netbox-enterprise.tgz

# Join the cluster (use the token from Admin Console)
sudo ./netbox-enterprise join <first-node-ip>:30000 <join-token>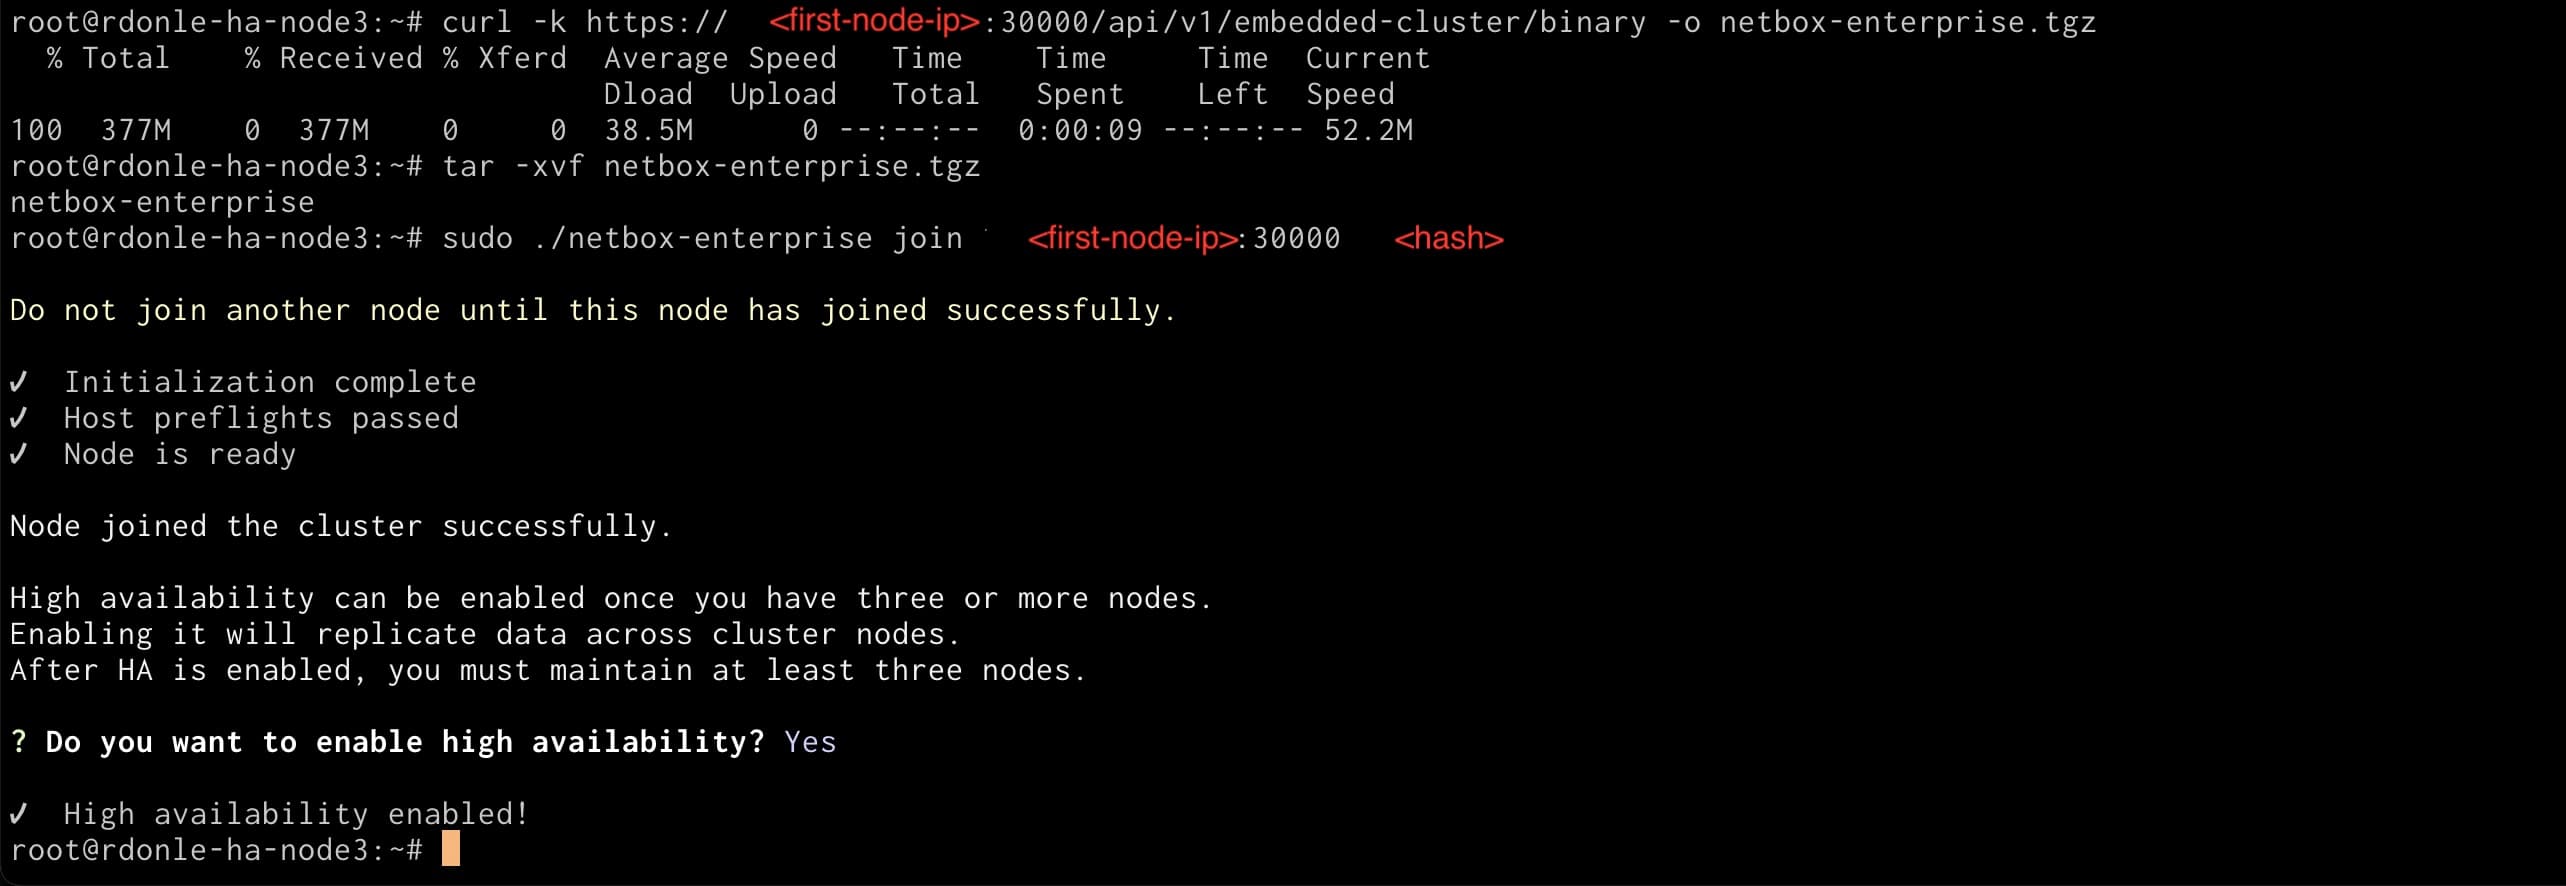
-
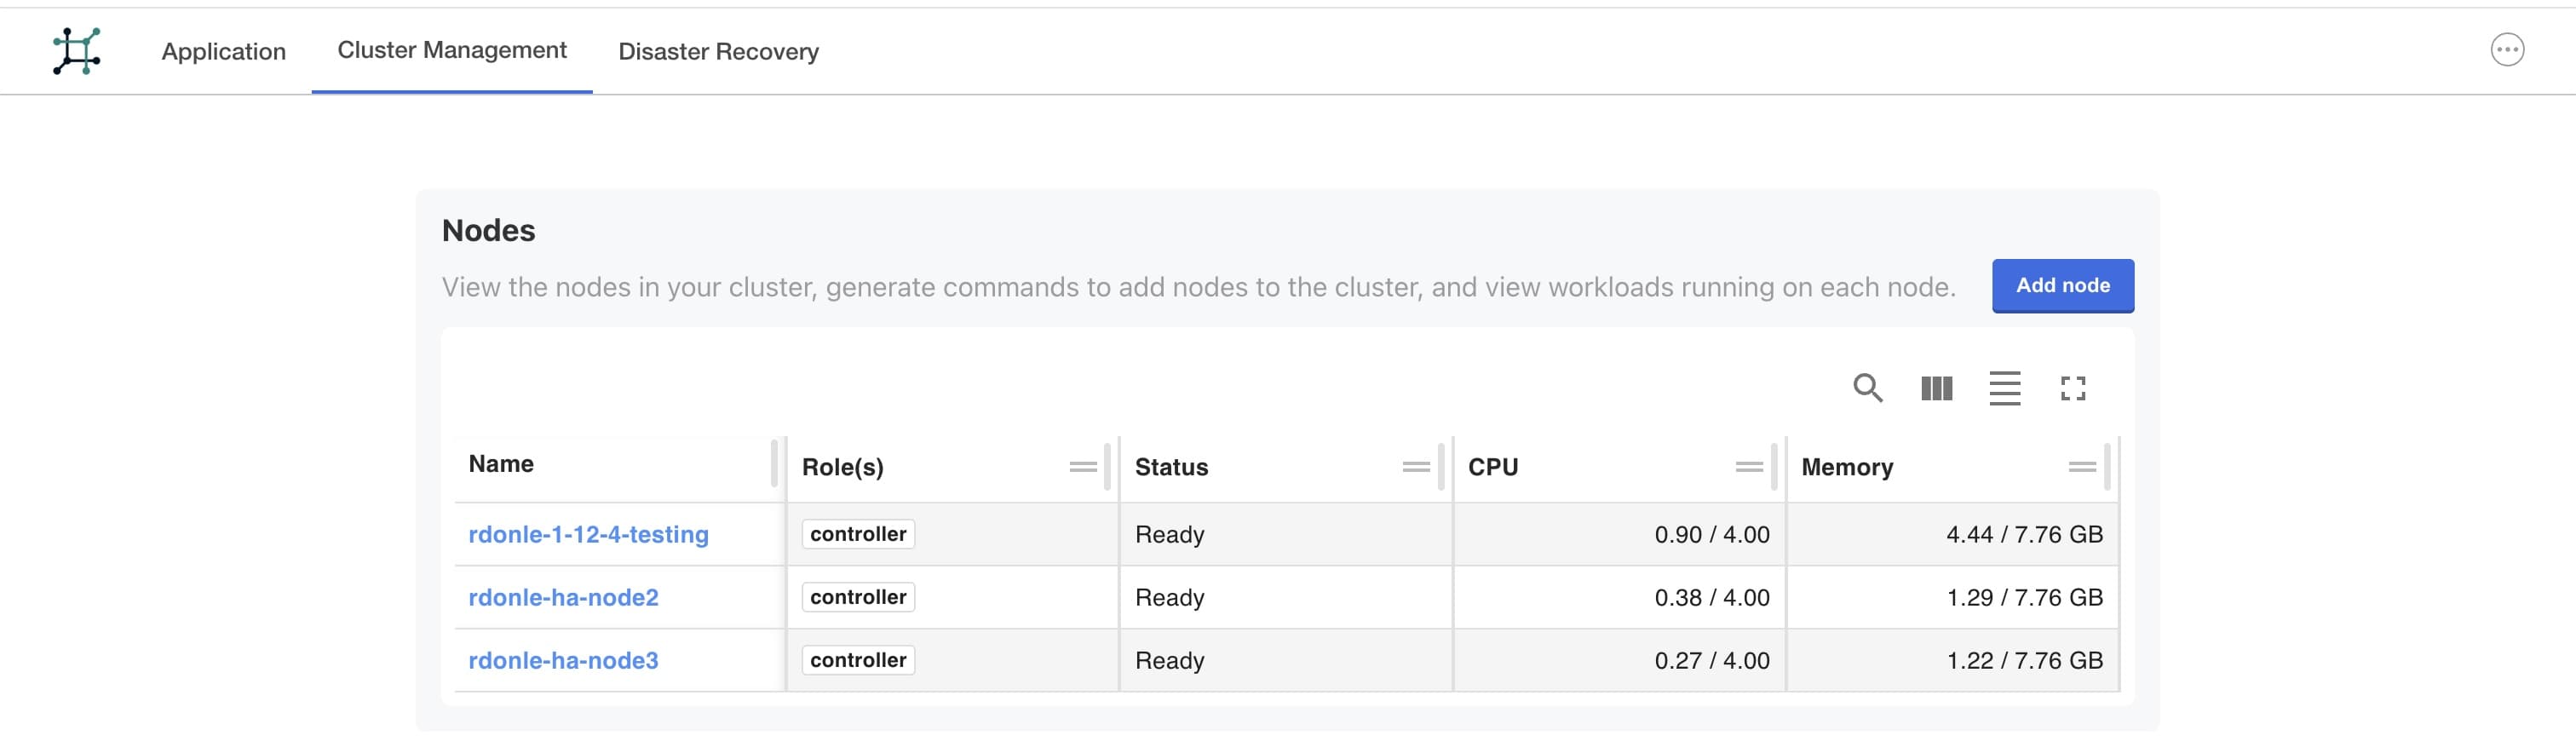
Verify nodes have joined successfully in the Cluster Management tab
-
Enable cluster HA:
When joining the third node, the installer will prompt you to enable high availability. If you choose Yes during the join process, HA will be enabled automatically.
If you did not enable HA during the join process, you can enable it later using the CLI:
sudo ./netbox-enterprise enable-ha
The Embedded Cluster will automatically distribute workloads across all nodes once they join.
Load Balancer Configuration
For true high availability, configure a load balancer in front of your multi-node cluster to provide a single entry point and automatic failover.
Requirements
- TCP load balancer (Layer 4) or application load balancer (Layer 7)
- TLS/SSL certificate with SANs for all node hostnames plus load balancer hostname
- Health check capability
Example Configuration
Consider a 3-node cluster:
- Node Hostnames:
netbox-01.example.com,netbox-02.example.com,netbox-03.example.com - Load Balancer VIP:
netbox.example.com - TLS Certificate SANs: All four DNS names (3 nodes + load balancer)
Load Balancer Setup
- Configure backend pool with all cluster nodes
- Forward TCP port 443 to all three nodes for NetBox web UI
- Forward TCP port 443 to all three nodes for Diode gRPC (if using Discovery/integrations)
- Configure health checks to verify node availability
- Install TLS certificate in NetBox Enterprise Admin Console with SANs for all hostnames
Health Check Configuration
Configure health checks to verify node availability:
| Check Type | Endpoint | Expected Response |
|---|---|---|
| HTTP | https://node:443/login/ | 200 OK |
| TCP | Port 443 | Connection accepted |
Certificate Installation
Install your TLS certificate with multiple SANs via the Admin Console:
- Navigate to Admin Console → Config → TLS
- Upload certificate, private key, and CA bundle (if applicable)
- Verify certificate includes all node hostnames plus load balancer hostname
- Save configuration and deploy changes
Users will access NetBox at https://netbox.example.com while the load balancer distributes requests across all healthy nodes.
Disaster Recovery for Multi-Node
Multi-node deployments use the same disaster recovery procedures as single-node installations. See the Backups Guide for complete instructions.
Important for Multi-Node Restore:
-
Create a Backup: Follow the standard disaster recovery backup procedure which stores backups in your configured S3 bucket.
-
Restore: When restoring a multi-node deployment:
- Run
sudo ./netbox-enterprise restoreon the first node - When prompted for S3 credentials, provide the same bucket, endpoint, and credentials used in your original deployment
- When prompted to add nodes during the restore process, use the provided join commands to add additional nodes to the cluster
- Complete the restore workflow following the restore instructions
- Run
The restore process will recreate your multi-node cluster with all data preserved from the S3-backed disaster recovery backup.
Post-Installation
After deployment:
- Configure Backups: Set up disaster recovery backups with Backup Essentials
- Configure SSO (optional): Azure AD, LDAP, OIDC, SAML
- Install Plugins (optional): Built-in or Custom
- Configure TLS: See TLS and Gateway Configuration
- Spread workloads across zones (optional): Tag nodes with topology labels to enable zone-aware pod spreading and storage replication. See Topology-Aware Node Labels
Troubleshooting
For issues specific to multi-node deployments:
About kubectl Access
The troubleshooting commands below run using kubectl. See the troubleshooting documentation for instructions on accessing your cluster from the command line.
Pod Distribution Issues: Verify nodes are healthy and have sufficient resources:
kubectl get nodes
kubectl get pods -n kotsadm -o wide
S3 Access Errors: Verify S3 credentials and connectivity from all nodes:
aws s3 ls s3://your-bucket-nameImages Not Loading: Check that CORS is properly configured on your S3 bucket to allow requests from your NetBox domain.
For general troubleshooting, see the NetBox Enterprise Troubleshooting Guide.