Getting Started with the Microsoft DNS Integration for NetBox
The Microsoft DNS integration is currently in customer preview. Contact support@netboxlabs.com if you have not already been onboarded.
This guide covers how to set up and run the Microsoft DNS Integration for NetBox.
- Prerequisites
- Host Requirements
- Windows DNS Server Requirements
- NetBox Setup
- Agent Setup and Configuration
- Expected Output
- View and Apply Discovered Data in NetBox Assurance
- View the Microsoft DNS Data in NetBox
- Additional Resources
Prerequisites
Before you begin, ensure you have the following:
- NetBox Cloud or NetBox Enterprise with NetBox Assurance
- Orb Agent Pro credentials (required to download the integration agent image)
- Windows DNS Server with WinRM enabled and a service account with access to the DNS Server PowerShell module
- Host System with Docker support
- Network connectivity between your host and both your NetBox instance and the Windows DNS Server
Host Requirements
System
- Operating System: Linux, macOS, or Windows with Docker support
- Memory: Minimum 2GB RAM (4GB recommended)
- Storage: 1GB free disk space
- Docker: Version 20.10 or later
Network
- Outbound gRPC/gRPCS access to Diode on your NetBox instance (typically port 443 for gRPCS)
- Outbound WinRM access to your Windows DNS Server - port 5986 for HTTPS (default) or port 5985 for HTTP
- DNS resolution for both NetBox and Windows DNS Server hostnames
- Firewall rules configured to allow the above connections from your agent host
Windows DNS Server Requirements
The integration connects to the DNS server using WinRM (Windows Remote Management) over NTLM authentication and runs PowerShell commands remotely. The following must be configured on the target Windows Server:
- WinRM enabled - run
winrm quickconfigon the server or use Group Policy to enable WinRM - HTTPS listener - configure a WinRM HTTPS listener on port 5986 (recommended), or use HTTP on port 5985
- Service account - a domain account that is a member of the local Administrators group on the DNS server, or has sufficient privileges to run
Get-DnsServerZoneandGet-DnsServerResourceRecord - DNS Server PowerShell module - installed as part of the DNS Server role on Windows Server
The integration uses NTLM authentication. The username must be in the format DOMAIN\username. Local accounts can use .\username or HOSTNAME\username.
NetBox Setup
Generate Diode Client Credentials
- Log into your NetBox instance
- Navigate to Diode → Client Credentials
- Click + Add a Credential
- Enter a descriptive name (e.g., "Microsoft DNS Integration")
- Click Create
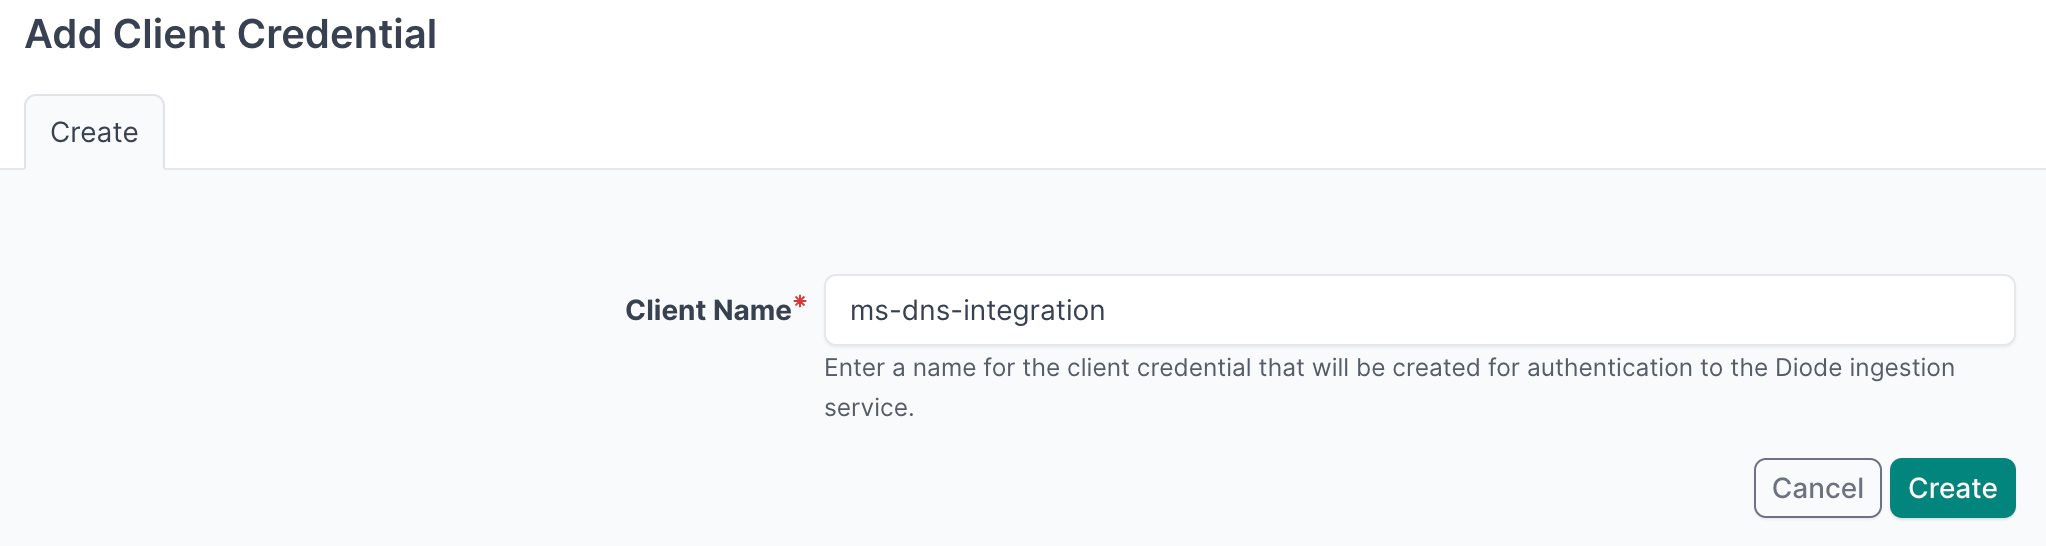
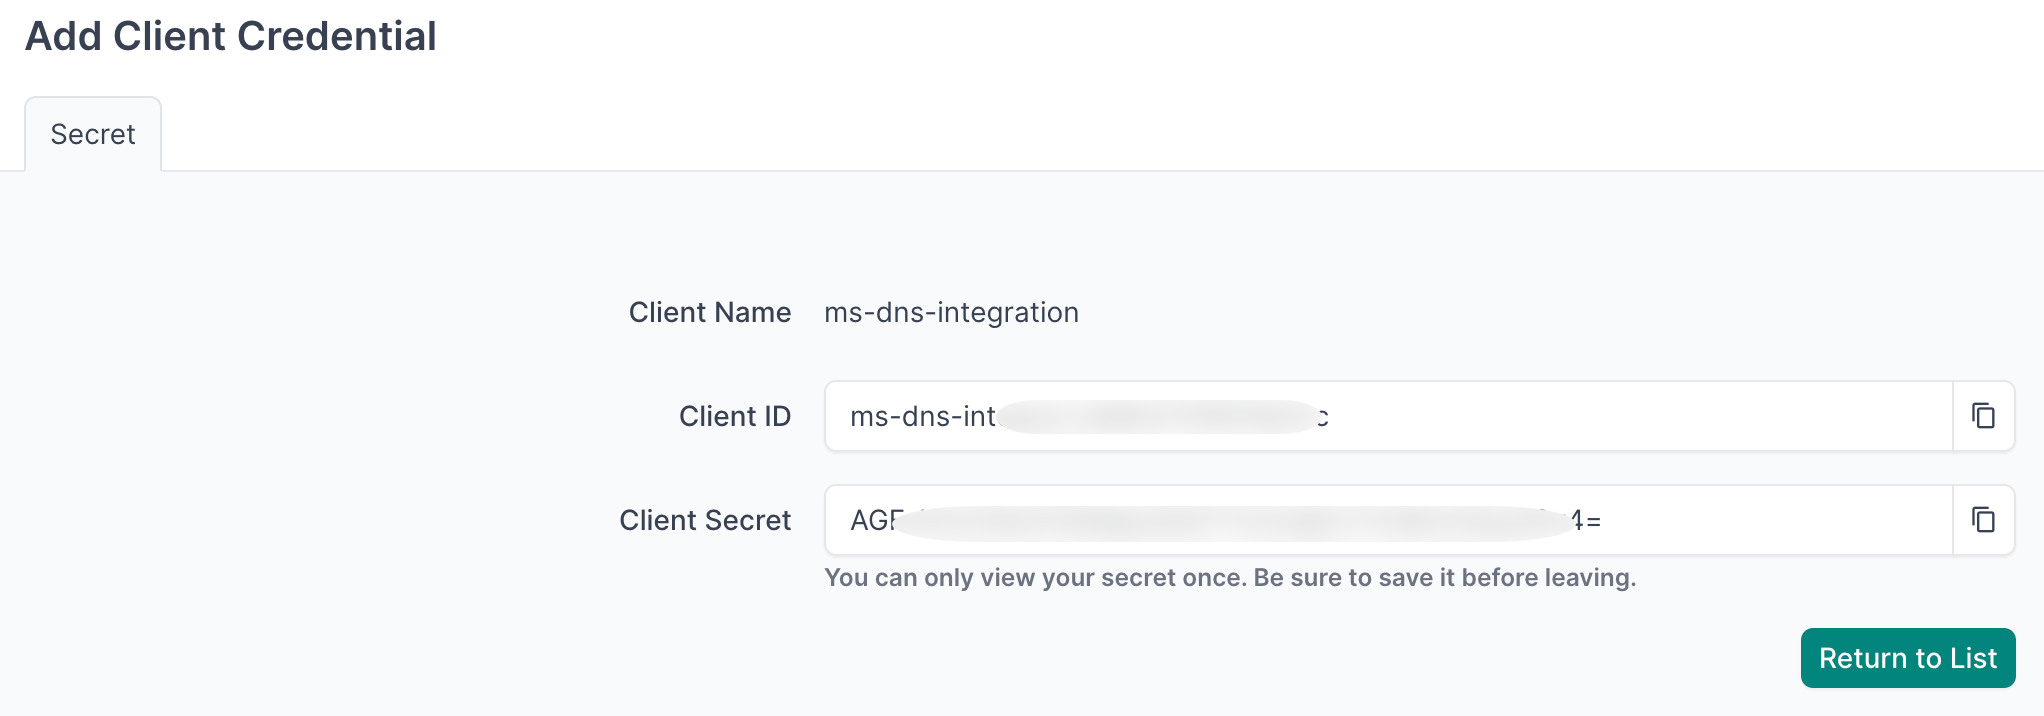
- Important: Copy and securely store the Client ID and Client Secret - you will need these in the agent configuration
- Navigate to Diode → Settings
- Copy the value of the Diode target - you will need this in the agent configuration

Agent Setup and Configuration
You can deploy multiple agents, each configured to sync data from a different Windows DNS Server.
Step 1: Authenticate to the NetBox Labs Image Registry
From your host machine, authenticate to the NetBox Labs registry using the CUSTOMER-IDENTIFIER and Token provided by the NetBox Labs team:
docker login quay.io -u netboxlabs+<CUSTOMER-ID> -p <TOKEN>
Example session
% docker login quay.io -u netboxlabs+org-abc123def456 -p <token>
Login Succeeded
Then pull the agent image:
docker pull quay.io/netboxlabs/orb-agent-pro:develop
Step 2: Configure the Agent
- Create the configuration file (you can name the file anything you like):
touch agent.yaml
- Edit the configuration file with your preferred editor and add the following configuration. Important: Replace
grpcs://your-instance.netboxcloud.com/diodewith the value from Diode > Settings > Diode target in the NetBox UI:
orb:
  config_manager:
    active: local
  backends:
    worker:
    common:
      diode:
        target: grpcs://your-instance.netboxcloud.com/diode # Get this value from Diode > Settings > Diode target
        client_id: ${DIODE_CLIENT_ID}
        client_secret: ${DIODE_CLIENT_SECRET}
        agent_name: msft_dns_agent_01  # Use a meaningful name to identify this agent
  policies:
    worker:
      msft_dns_worker:
        config:
          package: nbl_msft_dns
          schedule: "0 2 * * *" # Daily at 2:00 AM. Set your desired schedule (see examples below)
          MSFT_DNS_HOST: ${MSFT_DNS_HOST}
          MSFT_DNS_USERNAME: ${MSFT_DNS_USERNAME}
          MSFT_DNS_PASSWORD: ${MSFT_DNS_PASSWORD}
          # MSFT_DNS_USE_SSL: true       # Optional: use HTTPS WinRM on port 5986 (default: true)
          # MSFT_DNS_PORT: 5986          # Optional: override the WinRM port
          # MSFT_DNS_VERIFY_SSL: false   # Optional: verify WinRM TLS certificate (default: false)
          # MSFT_DNS_INCLUDE_ZONES:      # Optional: only sync zones matching these patterns
          #   - "corp.example.com"
          #   - "*.internal.example.com"
          # MSFT_DNS_EXCLUDE_ZONES:      # Optional: exclude zones matching these patterns
          #   - "*.lab.internal"
          BOOTSTRAP: True  # Set to True for initial setup, False for regular operation
        scope:            # Required — leave empty (Microsoft DNS does not support scope filtering)
The schedule field uses cron syntax. Here are some common examples:
"0 */6 * * *"- Every 6 hours (e.g., 00:00, 06:00, 12:00, 18:00)"0 2 * * *"- Daily at 2:00 AM"0 9 * * 1"- Weekly on Monday at 9:00 AM
Zone Filtering
By default, all forward-lookup zones on the DNS server are synchronized. Use MSFT_DNS_INCLUDE_ZONES and MSFT_DNS_EXCLUDE_ZONES to limit synchronization to specific zones. Both settings accept lists of zone names or glob patterns. Matching is case-insensitive. Exclude is applied after include - exclude always wins.
Pattern syntax:
*matches any sequence of characters including dots (e.g.,*.corp.example.commatchesdev.corp.example.comanda.b.corp.example.com)?matches a single character- Exact zone names can also be listed without wildcards
Example: sync only specific zones
config:
  MSFT_DNS_INCLUDE_ZONES:
    - "corp.example.com"
    - "internal.example.com"
Example: sync all zones except test zones
config:
  MSFT_DNS_EXCLUDE_ZONES:
    - "*.lab.internal"
    - "test.example.com"
Example: MSP per-client filtering
A DNS server hosting zones across multiple clients - sync only zones for a specific client:
config:
  MSFT_DNS_INCLUDE_ZONES:
    - "*.acme.example"
    - "acme-internal.local"
Filtering happens before any per-zone PowerShell record query, so excluded zones do not incur an API call. If zones are discovered but all are filtered out, the integration logs a warning.
Bootstrap Mode (First-Time Setup)
Bootstrap mode creates the required custom field in NetBox before the first full DNS sync. In bootstrap mode, the agent does not connect to the DNS server.
What Bootstrap Mode Does:
- Creates the
msft_dns_additional_namescustom field on IP Address objects
Configuration:
config:
  BOOTSTRAP: True  # Set to True for initial setup, False for regular operation
First-Time Run Process:
- Run the agent with
BOOTSTRAP: Truein your configuration - Monitor the output for the text
executed successfully - Stop the agent immediately by pressing
Ctrl+Cin your terminal once you seeexecuted successfully - Apply the deviations in NetBox Assurance (see Apply Deviations below)
- Set
BOOTSTRAP: Falsefor all future runs
Important Notes:
- Bootstrap mode is only for first-time setup - do not run it on a schedule
- Stop the agent manually with
Ctrl+Cafter seeingexecuted successfully - Once deviations are applied, set
BOOTSTRAP: Falsefor regular operation
Optional - Dry Run Mode
The agent can be run in Dry Run mode, which writes discovered data to a JSON file instead of sending it to NetBox. This is useful for troubleshooting or reviewing what the integration will ingest before committing to your NetBox instance.
Enable dry run in the diode section of your agent configuration file:
      diode:
        dry_run: true
        dry_run_output_dir: /opt/orb/ # saves the output file to this directory
Step 3: Run the Agent
Method 1: Set Environment Variables Manually
- Export Diode credentials as environment variables:
export DIODE_CLIENT_ID="your-client-id"
export DIODE_CLIENT_SECRET="your-client-secret"
- Export DNS server credentials as environment variables:
export MSFT_DNS_HOST="dns-server.corp.example.com"
export MSFT_DNS_USERNAME="CORP\svc-netbox"
export MSFT_DNS_PASSWORD="your-password"
- Run the agent with the following command:
docker run \
  -v $PWD:/opt/orb/ \
  -e DIODE_CLIENT_SECRET \
  -e DIODE_CLIENT_ID \
  -e MSFT_DNS_HOST \
  -e MSFT_DNS_USERNAME \
  -e MSFT_DNS_PASSWORD \
  quay.io/netboxlabs/orb-agent-pro:develop \
  run -c /opt/orb/agent.yaml
Method 2: Use a .env File (Recommended)
- Create a
.envfile in your current directory:
touch .env
- Edit the
.envfile with your preferred editor and add the following content:
# NetBox Diode credentials
DIODE_CLIENT_ID=your-client-id
DIODE_CLIENT_SECRET=your-client-secret

# Microsoft DNS Server credentials
MSFT_DNS_HOST=dns-server.corp.example.com
MSFT_DNS_USERNAME=CORP\svc-netbox
MSFT_DNS_PASSWORD=your-password
Replace the placeholder values with your actual credentials:
your-client-idandyour-client-secretfrom the NetBox Diode setupdns-server.corp.example.comwith your Windows DNS Server hostname or IP addressCORP\svc-netboxwith your service account inDOMAIN\usernameformatyour-passwordwith the service account password
- Run the agent with the following command:
docker run \
  -v $PWD:/opt/orb/ \
  --env-file .env \
  quay.io/netboxlabs/orb-agent-pro:develop \
  run -c /opt/orb/agent.yaml
Add .env to your .gitignore file to prevent accidentally committing credentials to version control:
echo ".env" >> .gitignore
Expected Output
After starting the agent, depending on the schedule you defined, you should see output similar to the following:
{"time":"2025-09-10T09:00:01.123456789Z","level":"INFO","msg":"worker stderr","log":"INFO:nbl_msft_dns.msft_dns_diode:Starting Microsoft DNS integration for host: dns-server.corp.example.com"}
{"time":"2025-09-10T09:00:01.234567890Z","level":"INFO","msg":"worker stderr","log":"INFO:nbl_msft_dns.dns_client:Retrieved 4 DNS zones"}
{"time":"2025-09-10T09:00:01.345678901Z","level":"INFO","msg":"worker stderr","log":"INFO:nbl_msft_dns.dns_client:Retrieved 12 A records from zone: corp.example.com"}
{"time":"2025-09-10T09:00:01.456789012Z","level":"INFO","msg":"worker stderr","log":"INFO:nbl_msft_dns.dns_client:Retrieved 3 A records from zone: internal.example.com"}
{"time":"2025-09-10T09:00:01.567890123Z","level":"INFO","msg":"worker stderr","log":"INFO:nbl_msft_dns.builders.ip_addresses:Built 14 IP address entities from DNS"}
{"time":"2025-09-10T09:00:01.678901234Z","level":"INFO","msg":"worker stderr","log":"INFO:nbl_msft_dns.msft_dns_diode:Returning 15 entities"}
{"time":"2025-09-10T09:00:01.789012345Z","level":"INFO","msg":"worker stderr","log":"INFO:worker.policy.runner:Policy msft_dns_worker: Successful ingestion"}
{"time":"2025-09-10T09:00:01.890123456Z","level":"INFO","msg":"worker stderr","log":"INFO:apscheduler.executors.default:Job \"PolicyRunner.run (trigger: cron[month='*', day='*', day_of_week='*', hour='2', minute='0'], next run at: 2025-09-11 02:00:00 UTC)\" executed successfully"}
Success Indicators: Look for Successful ingestion in the output, which confirms data was sent to your NetBox instance via Diode.
Testing Mode: For testing purposes, run the agent once and then stop it by pressing Ctrl+C. This is useful for verifying configuration before setting up continuous operation.
Continuous Operation: The agent will continue running according to your schedule until manually stopped or the container is terminated.
View and Apply Discovered Data in NetBox Assurance
Once the agent has run, DNS data is staged as deviations in the NetBox Assurance UI.
NetBox Assurance gives you control over operational drift by identifying deviations between your operational state and NetBox, and analytics to understand drift and plan for remediation, and ultimately take action.
Deviations are the delta between the data already in NetBox as the Network Source of Truth, versus the actual operational state of the network as discovered by the integration.
From an initial run, all discovered data may appear as deviations since it did not previously exist in NetBox. Once the initial sync is applied, subsequent runs will surface only new or changed data.
Accessing NetBox Assurance
- Navigate to your NetBox instance
- Click on Assurance in the main navigation menu
Explore Deviation Types
- Click on Deviation Types to view the types of deviations discovered
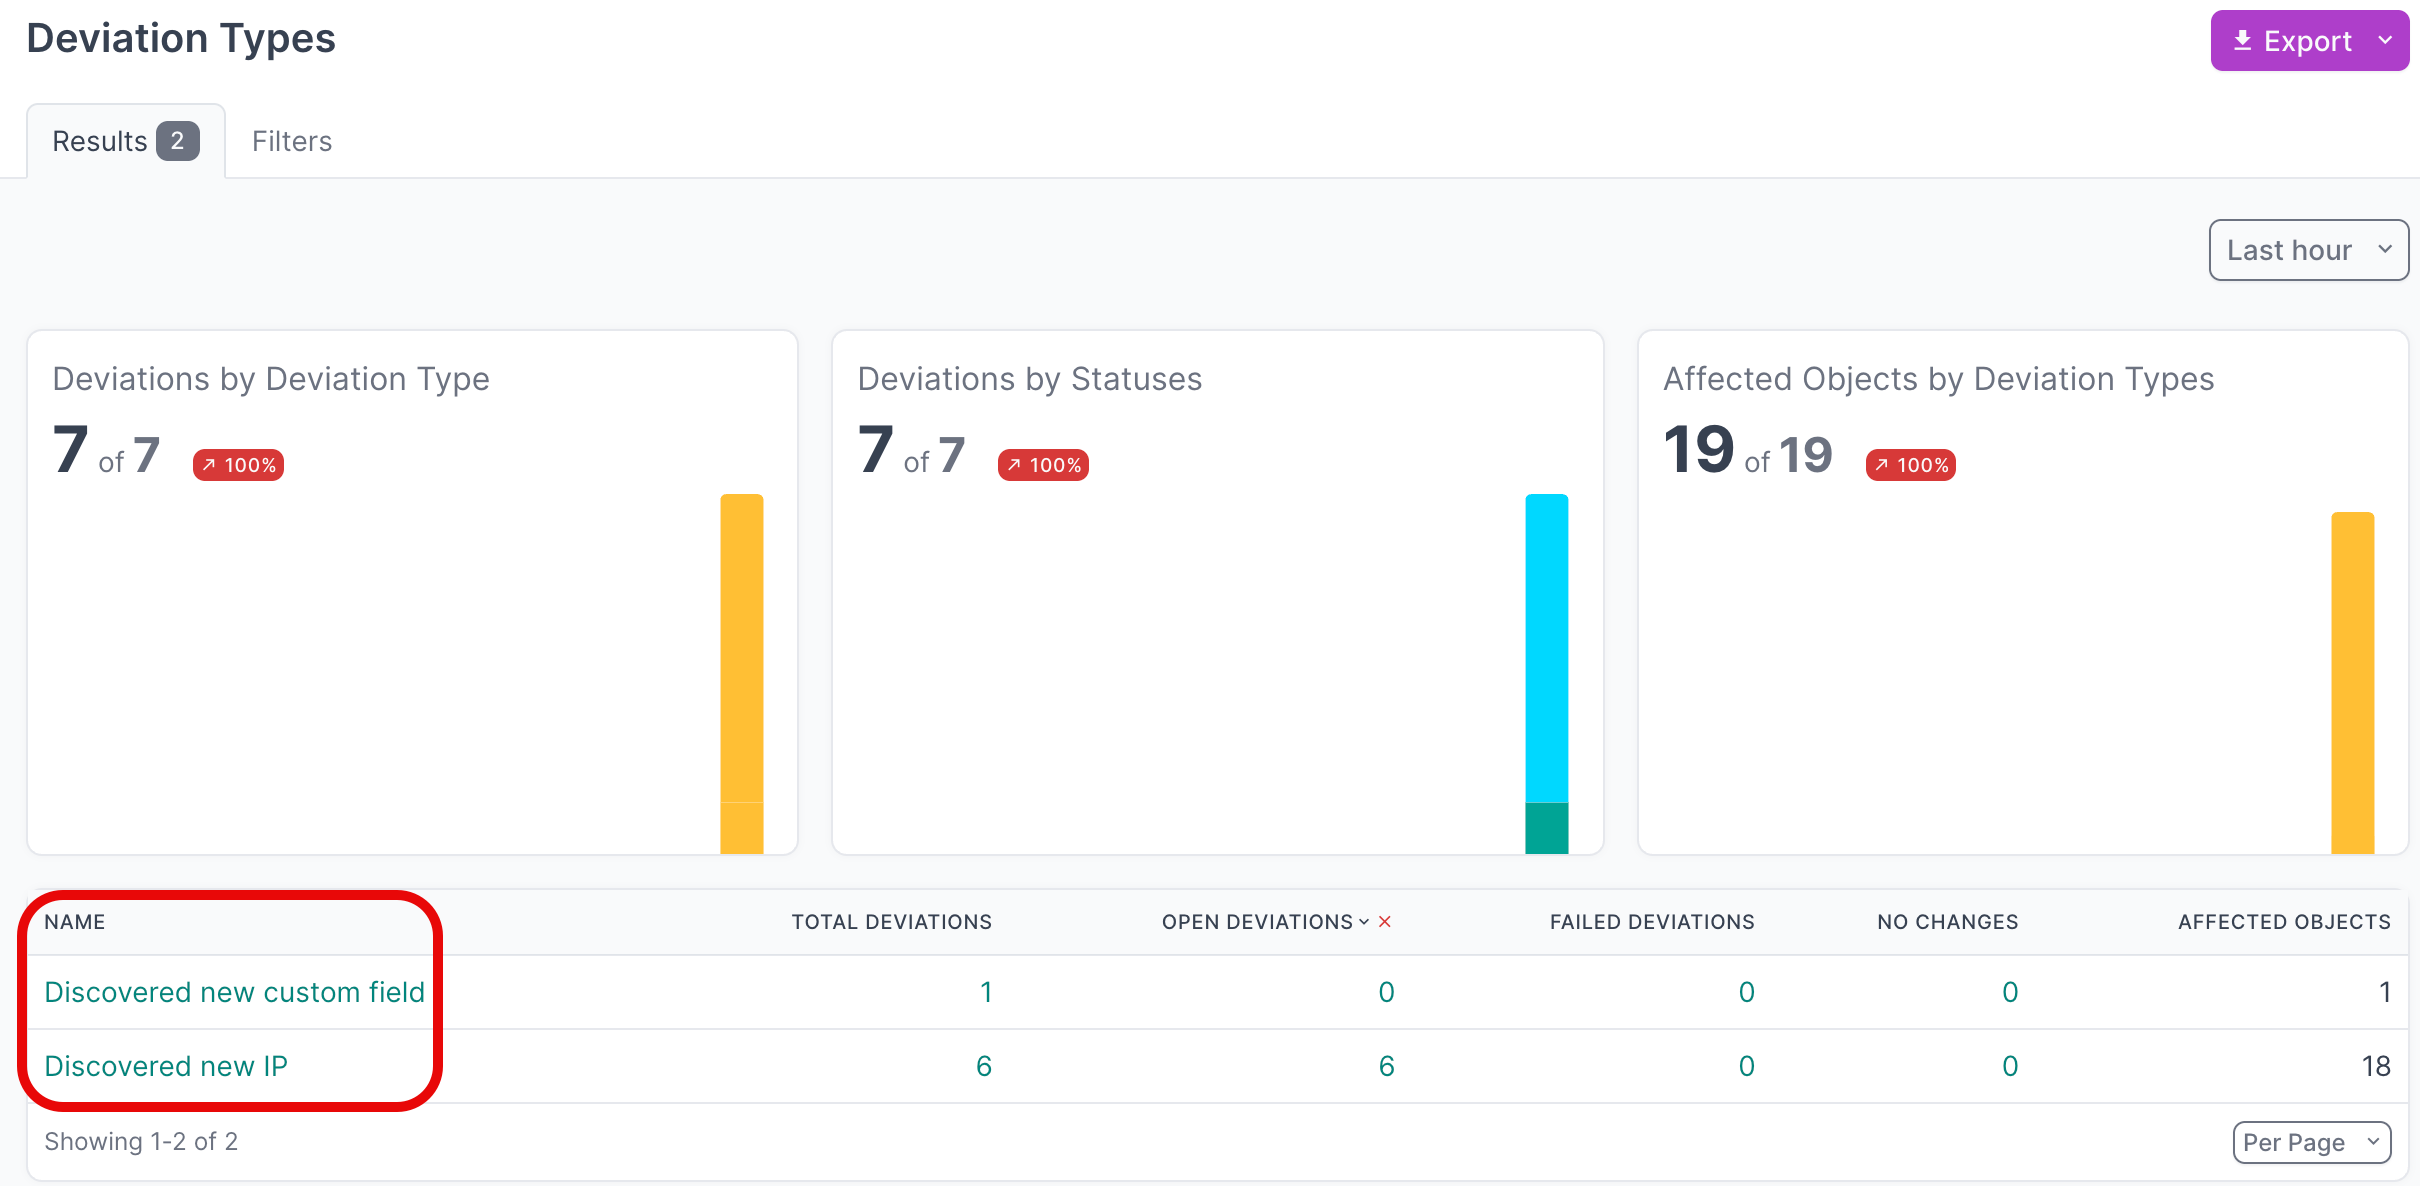
- Click on the Name of a deviation type to view its deviations

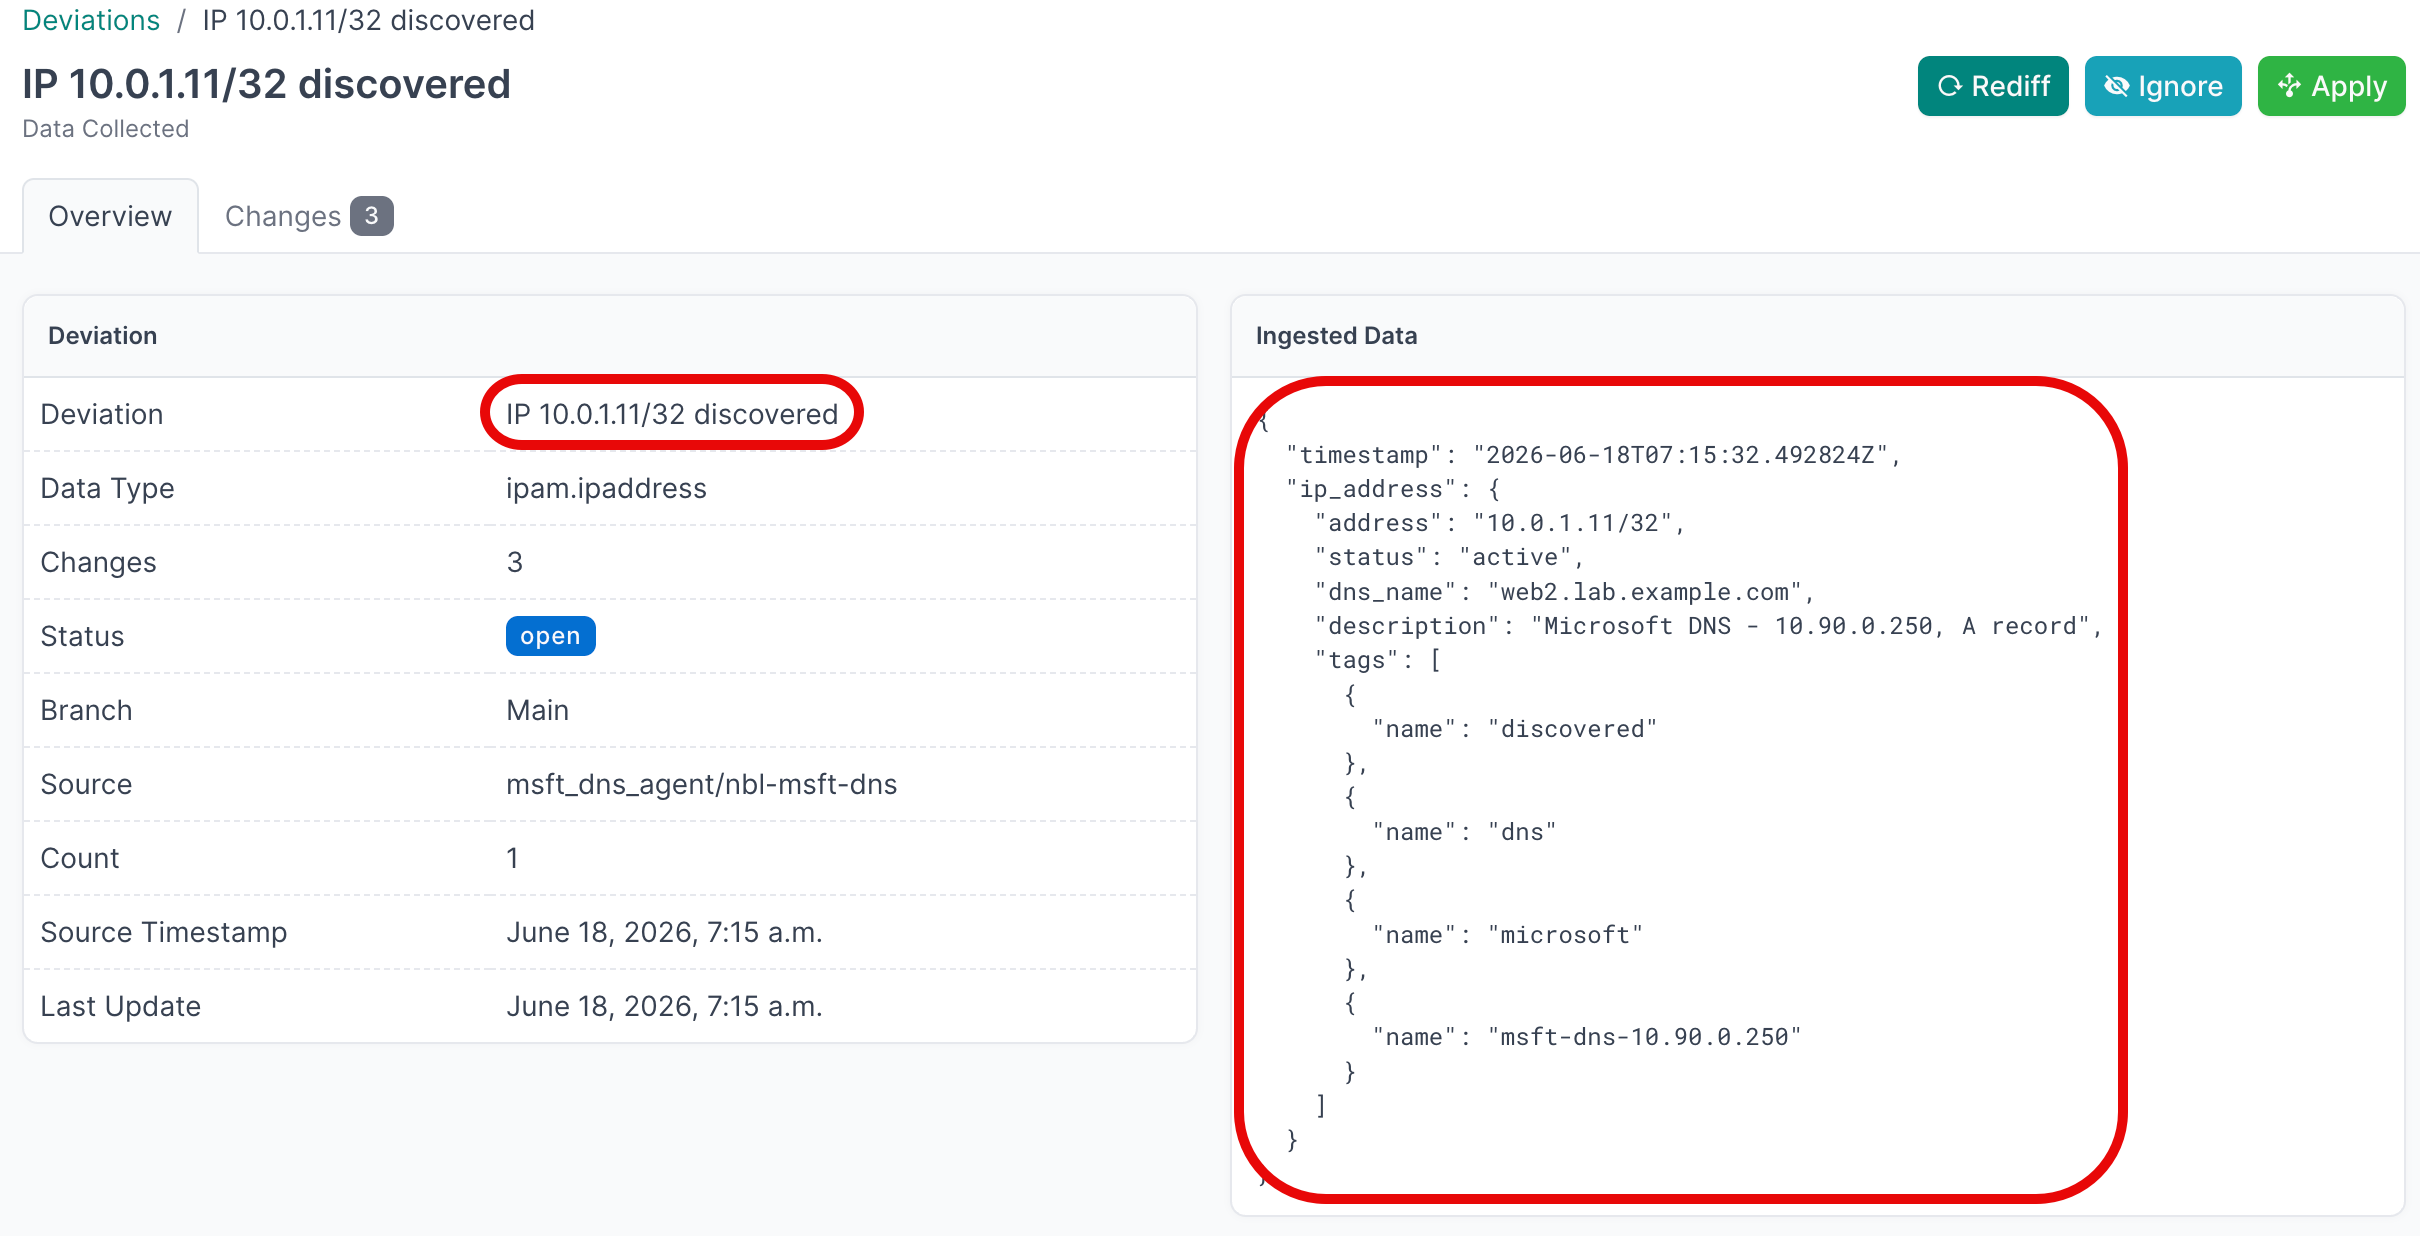
- Click on the Name of an individual deviation to view the details
View Active Deviations
- Click on Active Deviations to view all deviations that have not yet been Applied or Ignored

- Click on the Name of a deviation to view the details
Apply Deviations
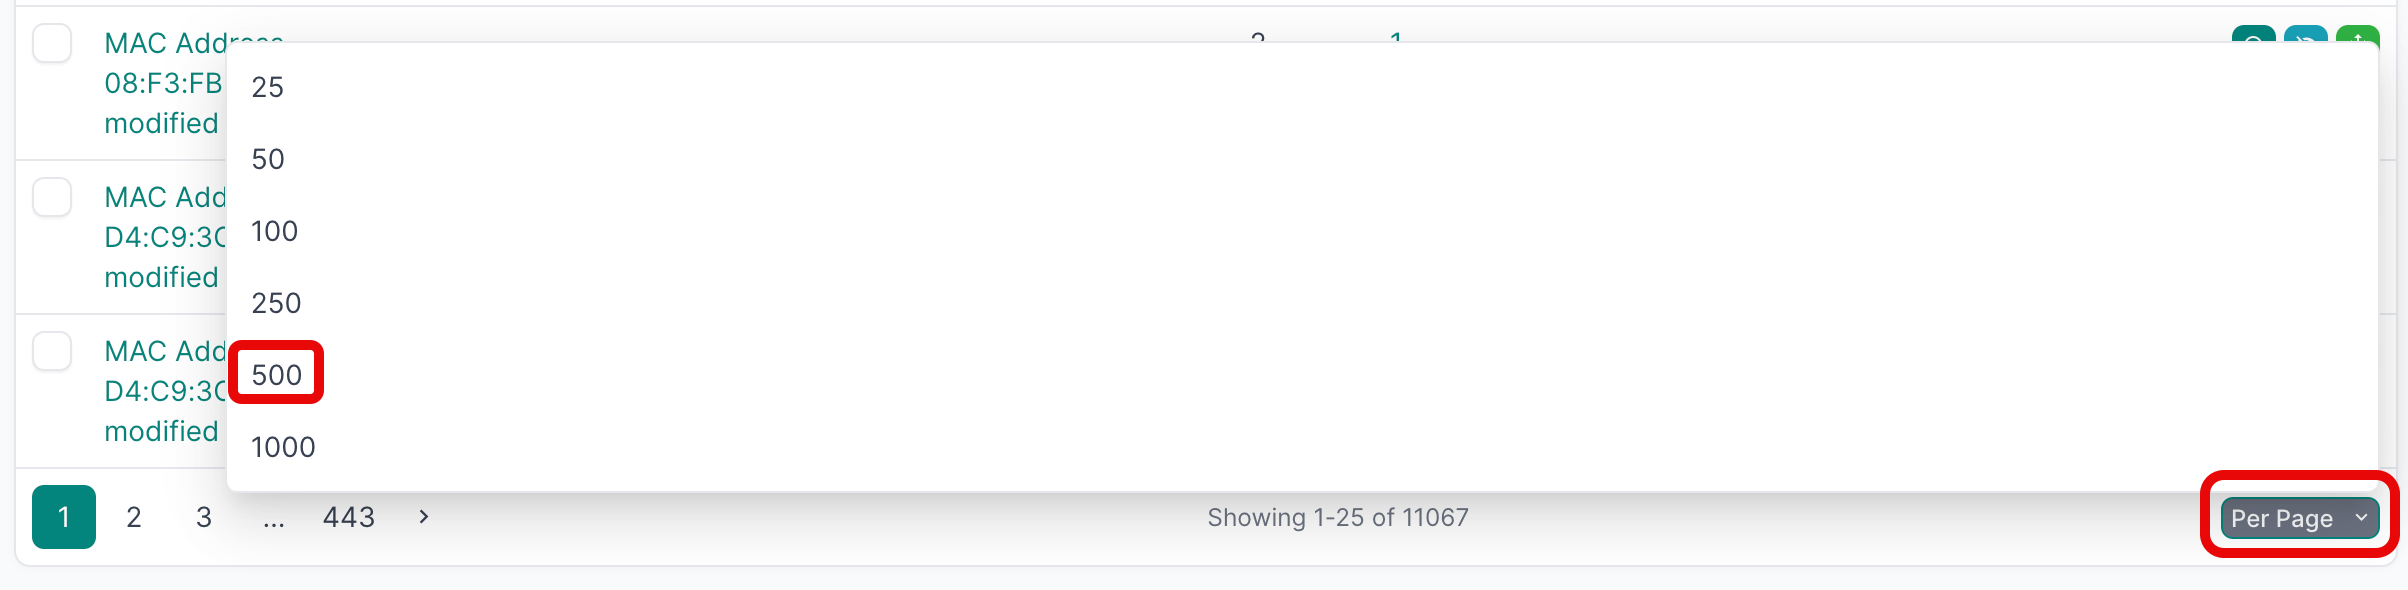
- Select all the deviations you want to apply. If you are working with a large number of deviations, first set the Per Page view to 500:
- Select the first deviation, hold
SHIFTand select the last one, then click Apply Selected: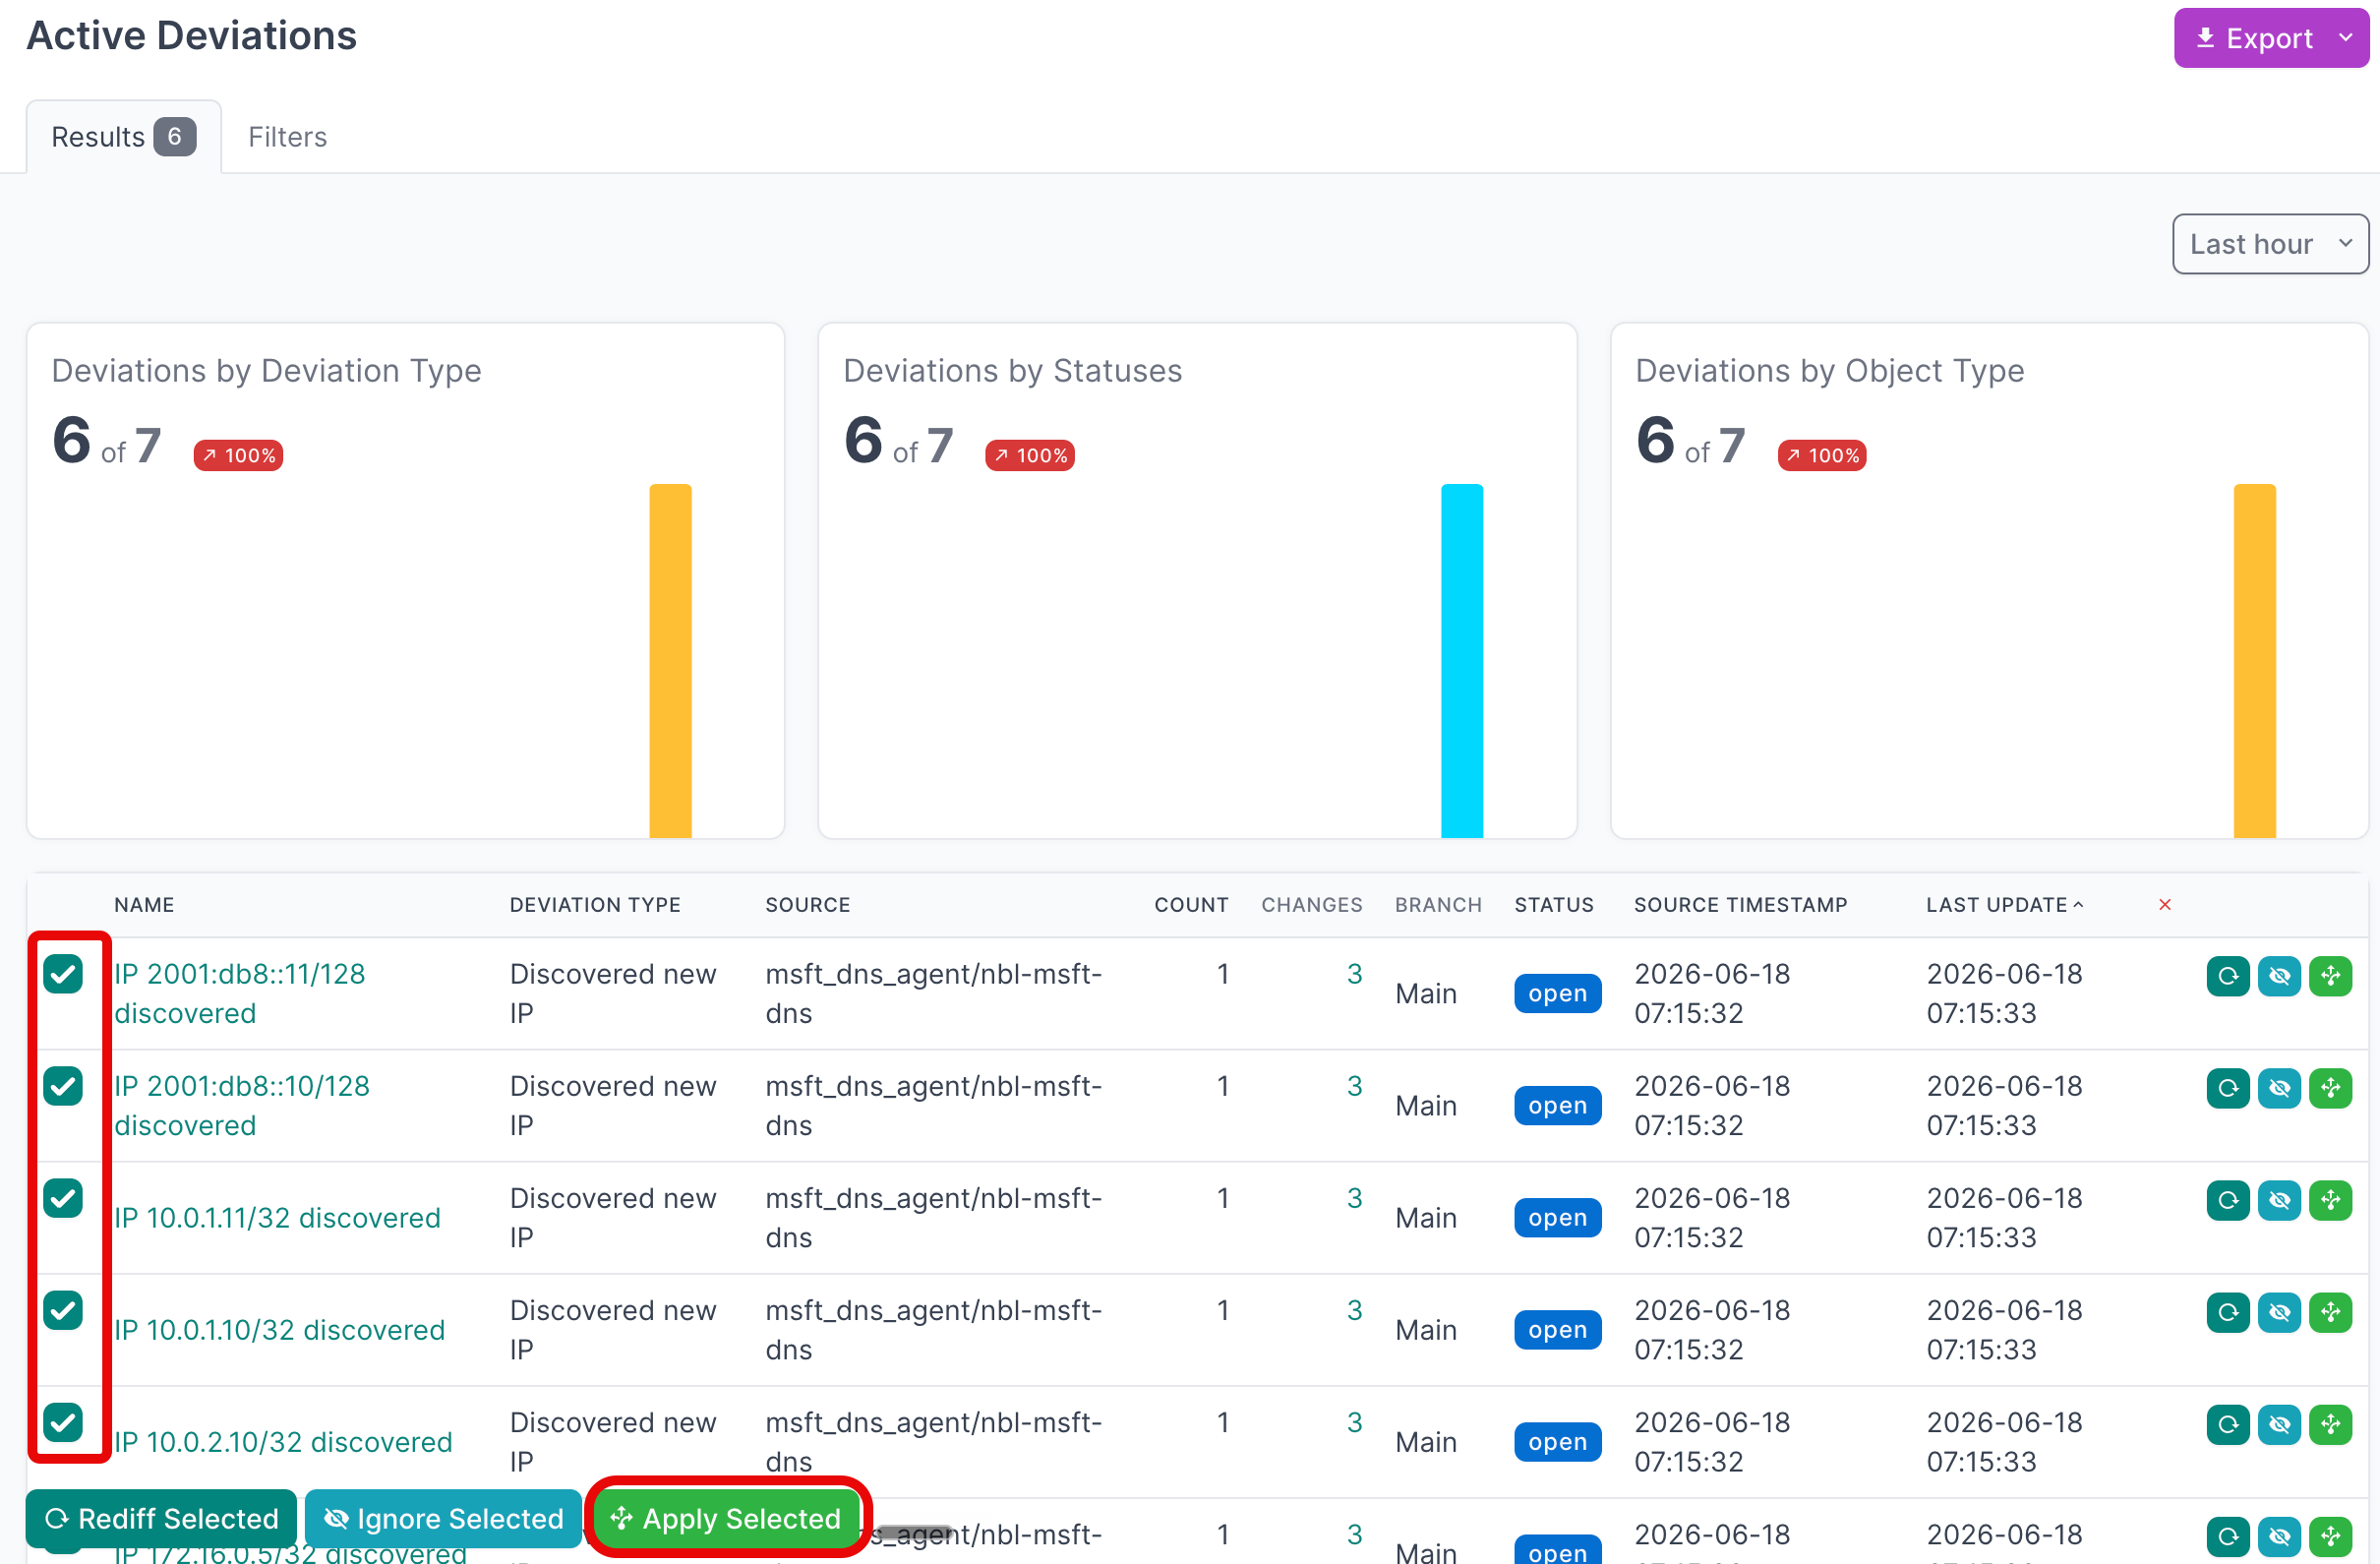
- Click Apply X Deviations to write the deviations to the NetBox database:

Instead of writing to the Main NetBox database branch, you can select another branch from the drop-down and apply deviations there.
For more detailed information on working with NetBox Assurance, refer to the documentation.
View the Microsoft DNS Data in NetBox
After running the integration and applying the discovered data, you can view it in the NetBox UI.
- Navigate to IPAM → IP Addresses to view synchronized IP addresses

- Select an individual IP address to view the details, including the DNS name and the
msft_dns_additional_namescustom field if more than one DNS name points to that address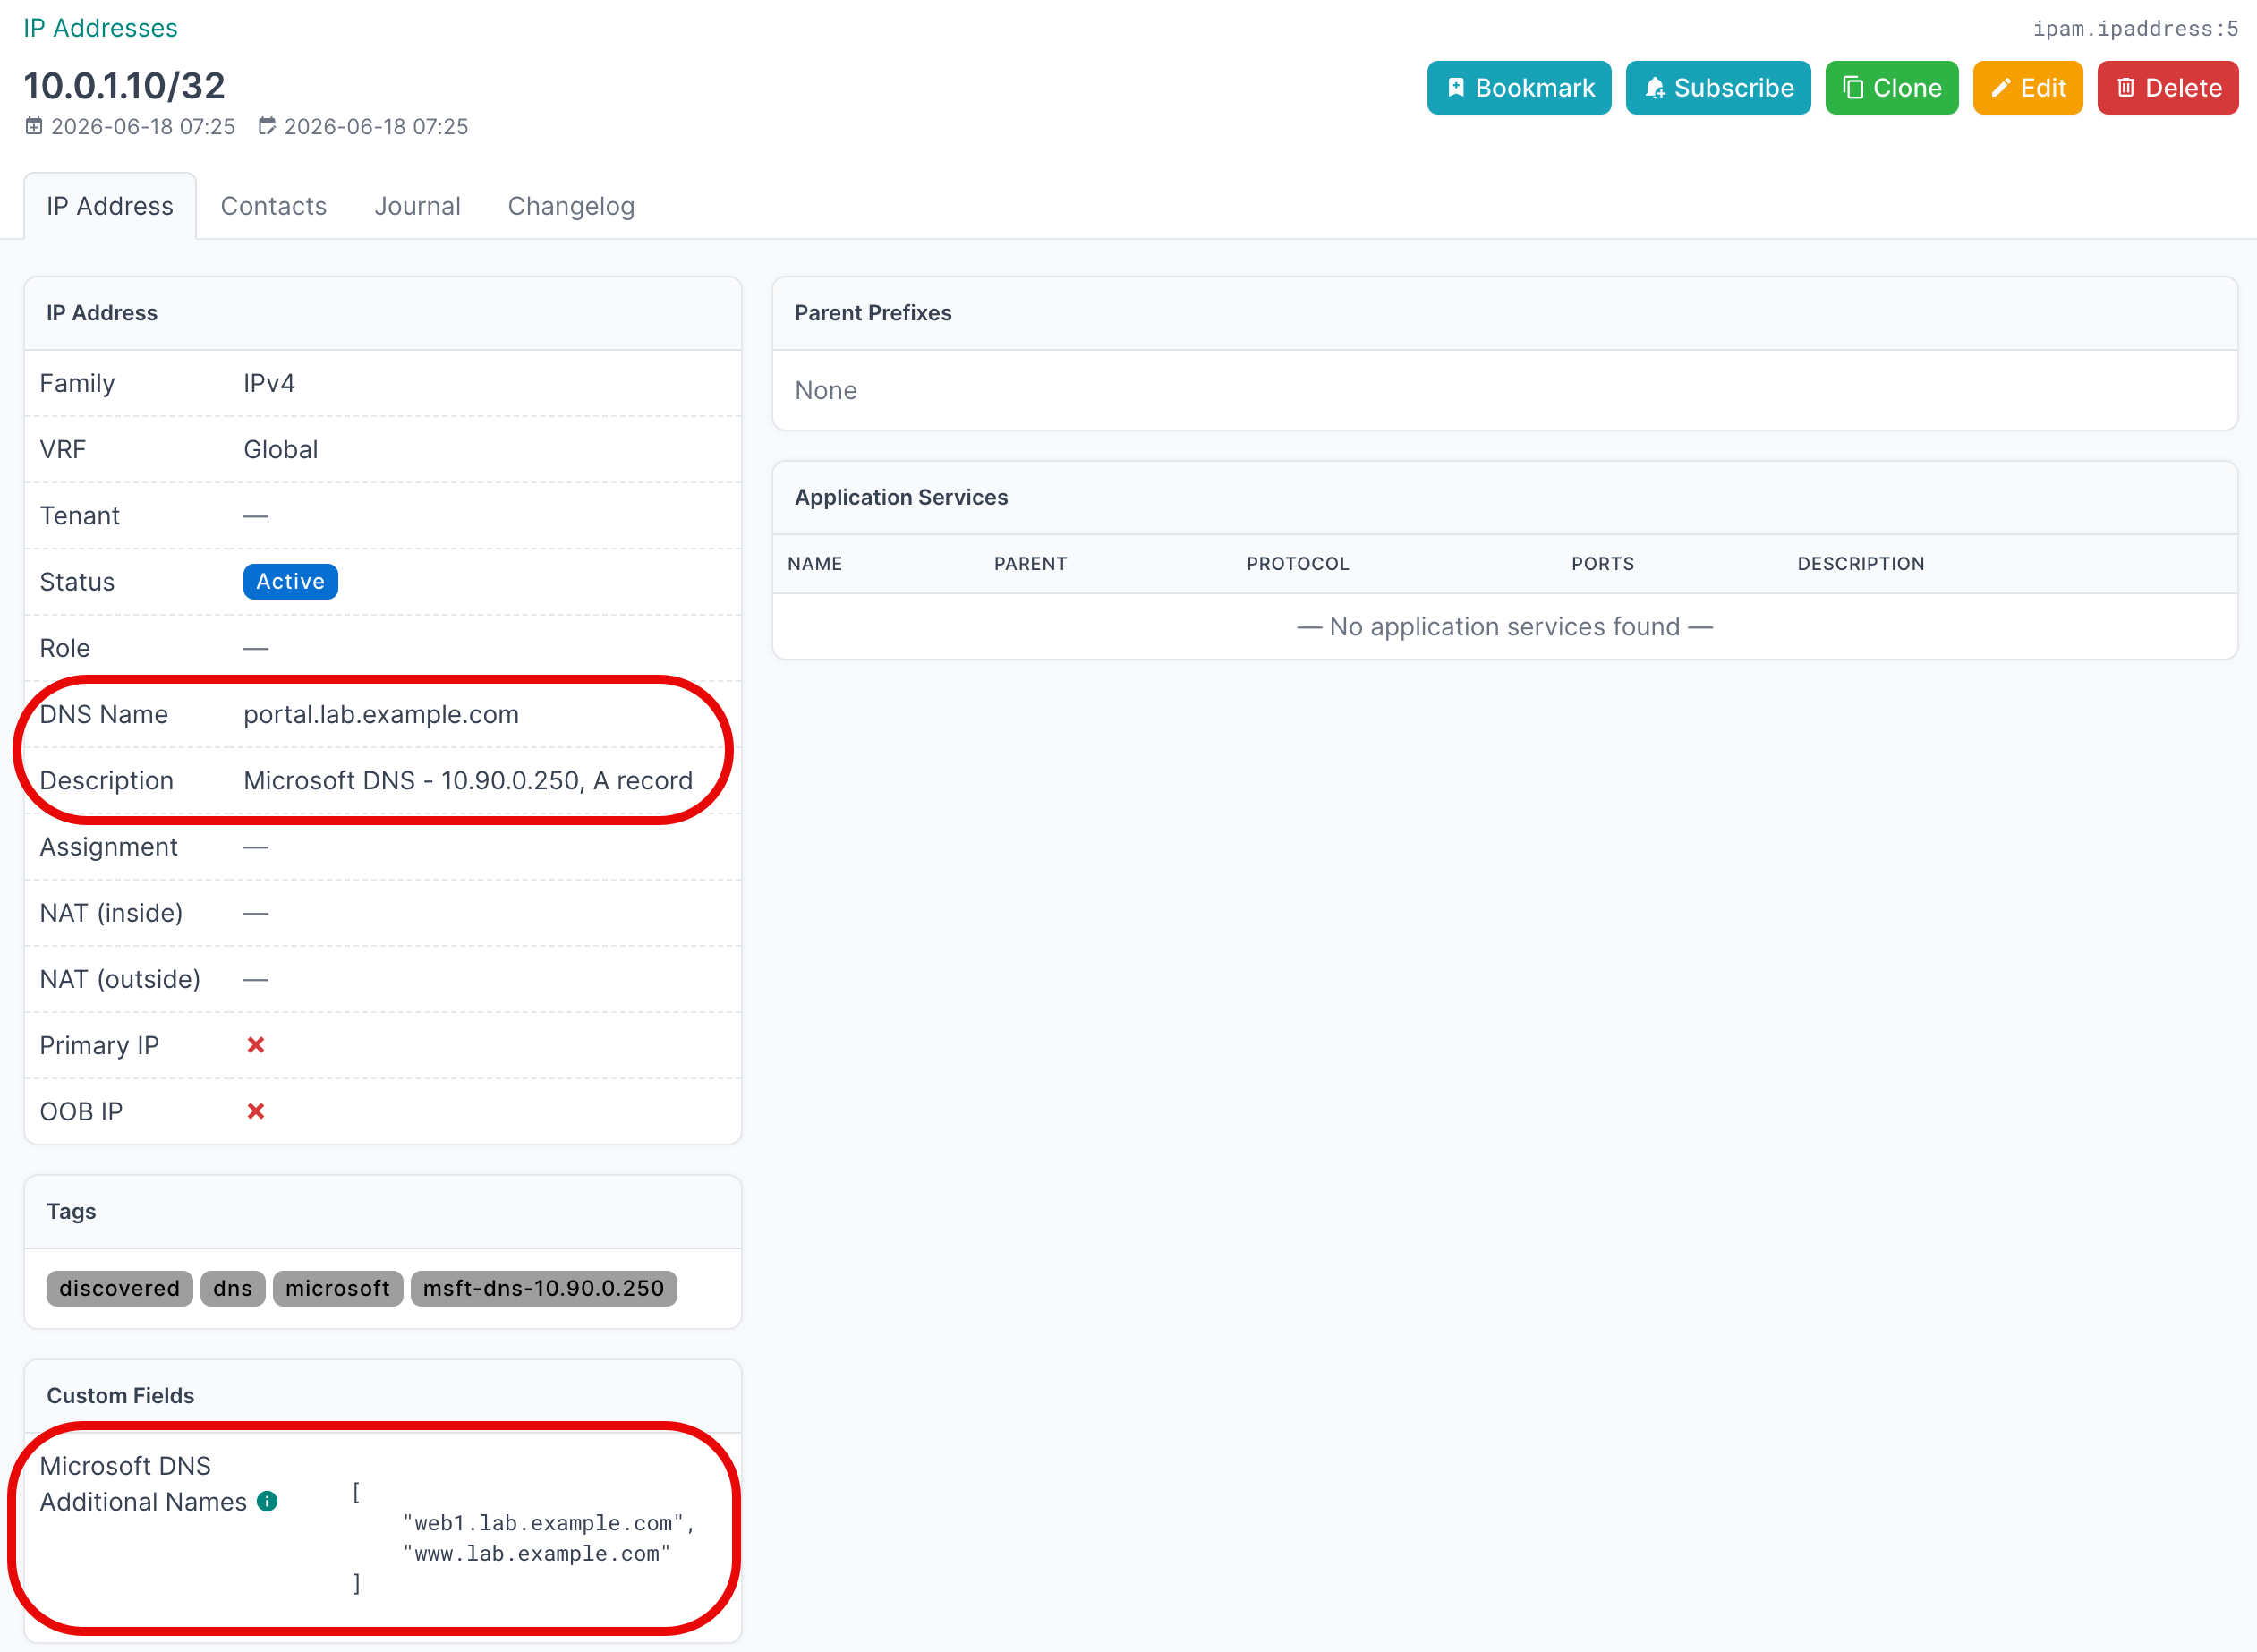
Filter the IP Addresses list by the microsoft or dns tag to view only DNS-discovered addresses.
Additional Resources
Related Documentation
Support
Email support@netboxlabs.com for support.